Become a MacRumors Supporter for $50/year with no ads, ability to filter front page stories, and private forums.
Status
The first post of this thread is a WikiPost and can be edited by anyone with the appropiate permissions. Your edits will be public.

kkclstuff

macrumors 6502
Apr 18, 2015
270
171
NYC
reversible upgrade successful! ~continued

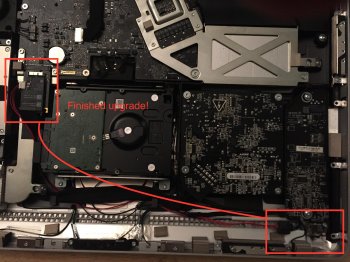
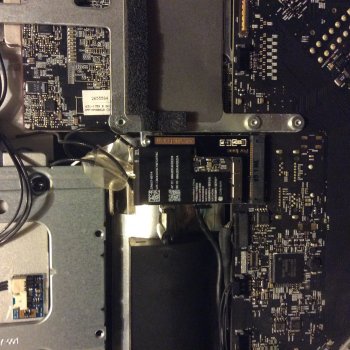
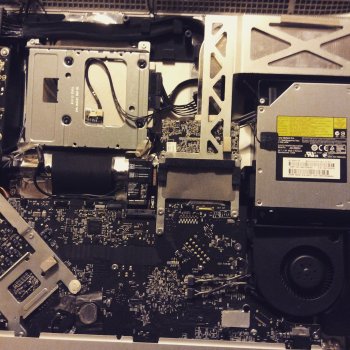
Final (scary) step was to open the iMac. It turns out to be pretty basic. Have a clean area to keep the removed the glass and screen. You'll need suction cups and torx# 6, 8, 10 screwdrivers.

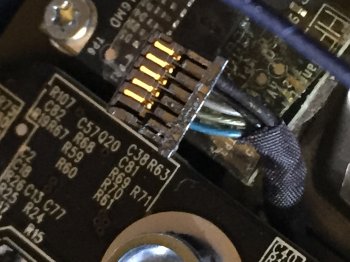
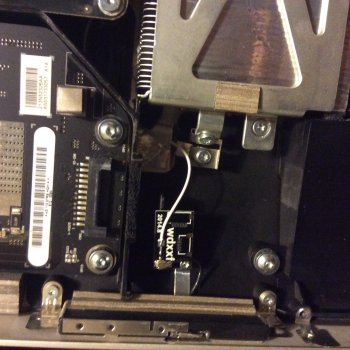
The only major issue I encountered was the Airport card mounting screw (T6) lines up perfectly with the new adapter card AND the Broadcom cards J2 lead. I removed the mount on the card and removed the screw. A small piece of electrical tape holds the card in place and shields the J2 lead from screw mount. Note: If I were to do it again, I would replace the OEM panhead screw with a flathead screw to mount the card THEN cover it with a piece of electrical tape to shield the J2 lead.

IMG_0022.JPG
IMG_0378.JPG
IMG_0382.JPG

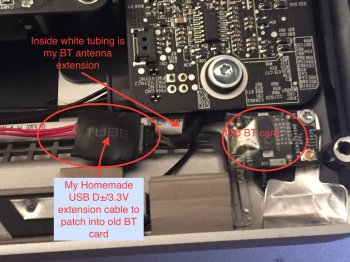
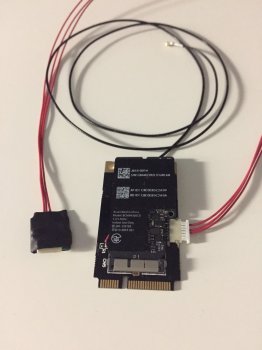
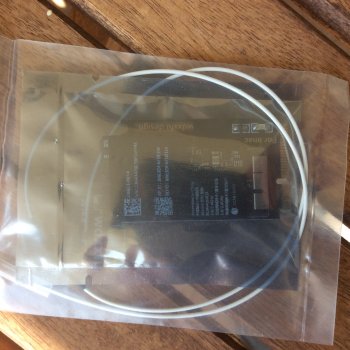
Also, I noticed the antenna leads are marked with "no band", "1 band", and "2 band" to indicate their location on the card. my "2" and "0" were misplaced. I believe this may explain some of my previous weak wifi and WOL behavior. I reinstalled the three leads to their proper locations (J0, J1, J2) and added the BT extension lead to J3. The J3 extension then connects to the old BT card.

IMG_0377.JPG

While I had the iMac opened I hit it with some canned air to do a little house cleaning and reassembled.

Restart...

I had to use my USB keyboard and mouse before I could re-pair my BT keyboard and trackpad. I logged out of iCloud (you may want to do this before the upgrade) restarted both iPhone and iMac... Success!

(see next post for more reference pics)

Thank you to EVERYONE who has posted to this thread, I couldn't have done it without your help!

Cheers
 
Last edited:

kkclstuff

macrumors 6502
Apr 18, 2015
270
171
NYC
reversible upgrade successful! ~reference pics

  1. Modded card with extension cables
  2. Layout inside the 21.5 iMac (top of mac at bottom of picture)
  3. Close up of BT card side
  4. 21.5 iMac 2011 BT card pinout (#1 empty)
 

Attachments

  • IMG_0379.JPG
    IMG_0379.JPG
    772.9 KB · Views: 1,718
  • IMG_0380.JPG
    IMG_0380.JPG
    2.7 MB · Views: 1,977
  • IMG_0383.jpg
    IMG_0383.jpg
    786.8 KB · Views: 1,761
  • IMG_0031.JPG
    IMG_0031.JPG
    720.5 KB · Views: 2,124
Last edited:
  • Like
Reactions: fineMechanical

Brientim

macrumors newbie
Jul 26, 2014
10
3
yifuhood, the white 4 pin female connector on the BACK of the adapter board "looks" like the same one I'm looking for.

UPDATE: found it! (for those who want to make their own removable USB D± and 3.3v cable)

JST connector model numbers
wire housing: SHLP-06V-S-B
shrouded header: SM06B-SHLS-TF
contacts:SSHL-003T-P0.2 (these are crimp-type contacts)


Thank you for the very detailed post and great effort identifying the JST connectors. Where did you finally source the connectors from?

I also see that the is another release of a modified V3 board on eBay which addresses the antenna connector and the board mounting lug and come with three ribbon extension connectors.

http://m.ebay.com.au/itm/111566024914?nav=WATCHING_ACTIVE
 

kkclstuff

macrumors 6502
Apr 18, 2015
270
171
NYC
Hi Brientim
I actually contacted JST directly for a sample to confirm size/compatibility. Up until then, I had no idea of the part# so CS @ Mouser/DigiKey/Others were unable to help me. The only info I had was gleaned from this thread and the BT card connector (1mm pitch). Its a bit of "a needle in a haystack" and a LOT of guess work with the Mouser database search tables! I believe you could source parts from any supplier now with the proper JST model #s. (IIRC, TLC electronics also had JST parts on their website)

I saw that ribbon cable card while researching. At A glance, I wouldn't recommend it for the iMac as there is no benefit to having the extra cable folded behind the screen, and the new location of the "extended card" would need to be researched for fit and also a mounting solution. The V.2 or V.3 adapter cards are a solid choice for this mod.

If you're looking for a solution to the design flaw of the T6 mounting screw and the J2 antenna lead, Id recommend "replacing the T6 panhead screw with the flathead screw + tape to insulate" its a quick and easy solution. OR even just tape the card over the screw mount (covering the exposed copper) that would hold the card in place and insulate at the same time. I made the mistake of breaking off my mount tab.


Good luck with your mod!
 
Last edited:

kkclstuff

macrumors 6502
Apr 18, 2015
270
171
NYC
reversible upgrade option – without JST connectors *theory*

It just dawned on me that it might be possible to make this upgrade without the JST connectors and only 3 solder joints. The only drawback to this is the easy-but-slightly-time-consuming disassembly/removal of the BT harness from the motherboard header housing. (I believe somebody briefly discussed using an extra/used harness earlier in the thread. Now I wonder why I didn't do it this way:p)


Parts:
  • Card Adapter (v.2 or v.3)
  • Wifi card
  • Extension antenna
  • *used BT/cam wire harness to scavenge wires


Since the JST connectors use a pliable plastic in the housing, you can disconnect wires by gently lifting the tabs slightly and sliding the wires out of the housing.
IMG_0301.JPG

1) Prepare original BT cable
  • Use a multimeter to check for continuity of the D±/V3.3 wires of the original BT cable.
  • Label the five wires at the motherboard housing.
  • Remove these five wires that supply the BT card and remove the harness at the BT card for storage.

2) Prepare the scavenged used harness and adapter card
  • Remove the three wires needed (D±/V3.3) from the scavenged used cable you purchased. (Two of the wires are ground and won't be use in the extension cable)
  • Solder one end of the three wires to their locations on the adapter card.
  • Install these three wires into the motherboard housing where the original cables were placed and labeled.

3) Replace original card
  • Mount adapter card in place.
  • Disconnect Original BT antenna.
  • Run extension antenna from WIFI card J3 to original BT antenna location.
  • Mount wifi card and antenna leads


It may not be the quickest "reversible solution" but maybe its the easiest mod as long as you label the harness at the motherboard.
Good Times!
 

yifuhood

macrumors member
Nov 3, 2014
75
16
here r the photos
 

Attachments

  • IMG_0738.JPG
    IMG_0738.JPG
    927.5 KB · Views: 1,476
  • IMG_0740.JPG
    IMG_0740.JPG
    967.2 KB · Views: 1,424
  • IMG_0745.JPG
    IMG_0745.JPG
    944.7 KB · Views: 1,442
  • IMG_0747.JPG
    IMG_0747.JPG
    749.1 KB · Views: 1,359
  • IMG_0749.JPG
    IMG_0749.JPG
    949.4 KB · Views: 1,415
  • Like
Reactions: Mr-Mur and mhafeez

kkclstuff

macrumors 6502
Apr 18, 2015
270
171
NYC
Hi yifuhood
looks good. is there an english link for that site? also, it said ¥300-350. what is the cost/whats included? ¥300 is about US$3. that can't be right, but a dream if it were true!

Edit:
\ahhh chinese yuan? thats about US$48. still great price!
 

Brientim

macrumors newbie
Jul 26, 2014
10
3
Can you clarify power sources for Bluetooth and wifi are separate and thus maintains independence?
 

yifuhood

macrumors member
Nov 3, 2014
75
16
Hi yifuhood
looks good. is there an english link for that site? also, it said ¥300-350. what is the cost/whats included? ¥300 is about US$3. that can't be right, but a dream if it were true!

Edit:
\ahhh chinese yuan? thats about US$48. still great price!
sorry there is no english link.
i bought the one which cost 350yuan, (51euro,56USD). the sending is about 16-20euro.

----------

Works with the mid 2011 imac 21.5? Can u help me?:)

I think it should. you just have to connect the imac Bluetooth cable to the adapter.

----------

Can you clarify power sources for Bluetooth and wifi are separate and thus maintains independence?

yes 100%
 

yifuhood

macrumors member
Nov 3, 2014
75
16
this is the email from the seller
wdxxfu@163.com

I donot know how good is his english , but try to write to him. the update kit is perfect. everything is so thoughtful,even the bluetooth antennal elongater is perfect fit in to replace the old bluetooth chip.
 

InfoTime

macrumors 6502a
Jul 17, 2002
500
261
Is this the kit we've been waiting for? No soldering? Reversible?

I've got a Late 2009 27" iMac. Will this kit work? I bought the OSXWiFi kit a long time ago but never installed it because there wasn't a solution to get the USB D+ and D- without cutting and soldering.

... hmm, as I write this it occurs to me that maybe I could just buy a new cable like someone did upthread. Trying to remember why people weren't just going that route as opposed to scavenging the connectors from the Apple Bluetooth boards?
 

osxwifi

macrumors newbie
Jul 28, 2014
12
2
Is this the kit we've been waiting for? No soldering? Reversible?

I've got a Late 2009 27" iMac. Will this kit work? I bought the OSXWiFi kit a long time ago but never installed it because there wasn't a solution to get the USB D+ and D- without cutting and soldering.

... hmm, as I write this it occurs to me that maybe I could just buy a new cable like someone did upthread. Trying to remember why people weren't just going that route as opposed to scavenging the connectors from the Apple Bluetooth boards?

Hello,

Please contact us with your order number. We have No soldering, No cutting, Reversible solution now.

Best Regards,
OSXWiFi
 

Brientim

macrumors newbie
Jul 26, 2014
10
3
Last edited:

yifuhood

macrumors member
Nov 3, 2014
75
16
that is a good news,thanks. I am think if i could update the graphics card with EI capitan.
 

picree

macrumors newbie
Mar 1, 2010
8
3
At the beginning of this thread @Czo cut one of the traces on the adapter card after soldering 3.3v power. The pictures clearly show which one (farthest on the right). Now everyone has moved on to v3 of the adapter card and claim the trace does not need to be cut. I am uncomfortable with that and would like to cut the trace anyways however the v3 adapter has the bcm94360cd mounted "face down". So where is the best place to cut this trace? Is it obvious through the coating to see where it runs on the back? The traces must now cross right?
 

kkclstuff

macrumors 6502
Apr 18, 2015
270
171
NYC
HI picree
I opted not to 'cut the trace'. I can confirm that I have independent control of both wifi and BT (iMac 2011, 10.10.3) No issues, smooth sailing. Also it doesn't matter which way the bcm94360cd faces as your modifying the adapter card not the Broadcom card so no worries there.

About seeing the trace areas: I used the v.3 adapter card. You can make out the trace as a highlighted bump along the trace. I suggest lots of light and a magnifier, you should have no issue in 'seeing' it. the covering is fairly delicate it will be easy to cut. (check out pics in #150 removing some of the covering was a little too easy, in the second pic you can see the raised traces) IIRC, I believe the cut trace was on the back side of the adapter. See Cordes post #75, he then mentions in #91 that he (and mhafeez) didn't cut the trace. I followed their lead.

Are you seeing reasons or benefits of cutting the trace please let us know.
thanks
 
Last edited:
  • Like
Reactions: mhafeez

picree

macrumors newbie
Mar 1, 2010
8
3
HI picree
I opted not to 'cut the trace'.

Are you seeing reasons or benefits of cutting the trace please let us know.
thanks
Thanks for the reply.

If the trace is fairly easy to find and cut (no multilayered board) then it just seems like it would be better not to back-feed 3.3v along that circuit. I personally don't know anything specific but I just don't like power going somewhere it wasn't intended. And, people saying it "works fine" is different than someone who says they know where it goes and can prove it doesn't have any adverse effects (not that I don't trust the information here but those are 2 different things).

Curt
 

picree

macrumors newbie
Mar 1, 2010
8
3
Another question for the thread: I thought I read in here someone saying the OSXWIFI solution didn't fit in their 2011 27" iMac as well as the v3 solution. v3 has the antennas facing back and, I believe OSXWIFI had them facing forward. At this point I could install either (one saves money, is more work, but may fit better?). I would probably opt for an easier install with the OSXWIFI unless the fit is too tight against the LCD panel.

Plus-it's unclear after reading the thread what the proper length should be for the antenna extension in a 2011 27" iMac.

Can anyone comment on either question?

Curt
 

yifuhood

macrumors member
Nov 3, 2014
75
16
Another question for the thread: I thought I read in here someone saying the OSXWIFI solution didn't fit in their 2011 27" iMac as well as the v3 solution. v3 has the antennas facing back and, I believe OSXWIFI had them facing forward. At this point I could install either (one saves money, is more work, but may fit better?). I would probably opt for an easier install with the OSXWIFI unless the fit is too tight against the LCD panel.

Plus-it's unclear after reading the thread what the proper length should be for the antenna extension in a 2011 27" iMac.

Can anyone comment on either question?

Curt
hi
I am not so sure if the osxwifi antennas facing up will not fit in imac 2011, but i am sure with the osxwifi solution , you will not able to screw the adapter on the 2011 imac. the adapter i have bought from china which you can screw it on , the bcm94360cd is already fixed on the adapter, and on the right side of the adapter, there is a holl for screwing.
 
Register on MacRumors! This sidebar will go away, and you'll see fewer ads.