UPDATE: It's working again -- I just decided to test today -- on the following configuration:
Latest version that I'll keep updated is at -
https://forums.macrumors.com/thread...t-supported-ieee-1394-firewire-ilink.2321691/
Current as of June 14 2022 below.
Hardware:
MacBook Pro (14-inch 2021)
Chip: Apple M1 Pro
OS: macOS Monterey - Version 12.4
Camcorder - Sony DCR-TRV103 NTSC (Digital 8 / Hi8 / Video8 tapes) - has a firewire (thunderbolt) ieee 1394 port.
Wiring:
Old Firewire 800 cable I had lying around or something like (
Bizlander Firewire High Speed Premium DV to Firewire Cable 800 1394B 800-400 IEEE 9 Pin Male to 4 Pin Male Cable 6FT for Mac Pro, MacBook Pro, Mac Mini, iMac PC,Digital Cameras, SLR )
|
V
Apple Thunderbolt to FireWire Adapter
|
V
Apple Thunderbolt 3 (USB-C) to Thunderbolt 2 Adapter
|
V
USB-C / Thunderbolt port on a 2021 MacBook Pro 14 inch
Software:
Install Homebrew: Directions at:
https://brew.sh
Install ffmpeg (at least version 5.0.1_2): via terminal app issue the following command:
brew install ffmpeg
Check to see if it works:
Wire up the camcorder as per above to the Mac and make sure the camcorder is ON and the switch on it is set to PLAY / VTR mode (not record mode).
Issue the following command from the Terminal app on your Mac -
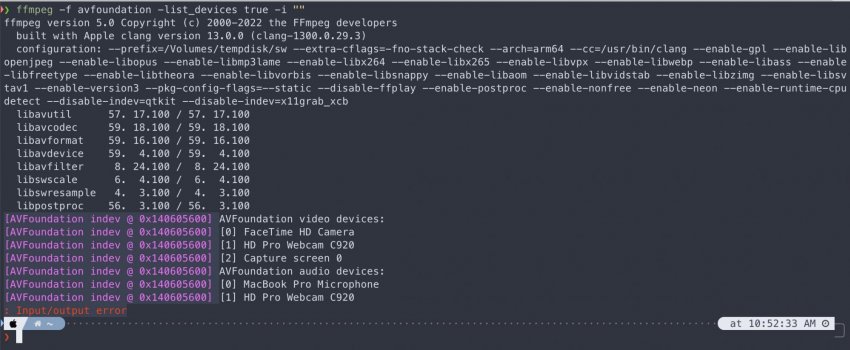
ffmpeg -f avfoundation -list_devices true -i ""
You should see some output from the command above with the name of your camcorder model (in my case - DCR-TRV103). Note down (copy) the EXACT spelling that is shown in above command's output. If your Camcorder is listed that means your Mac and Camcorder are communicating just fine via your firewire connection.
Proof it works (as of Jun 14 2022):
Capture Tape to Mac:
Capture a full video tape onto your Mac as a raw video Digital Video (.DV) file that you can later edit / compress / convert / etc..
You are ready to now capture the entire tape over to a .DV file onto your MacBook. It'll be BIG (~ 20 GB / hr of taped video) but for now you want to capture as losslessly as possible so you can do edits, color correction, etc.. with the best quality material possible - which is in this case the .DV file. Post capture, at your leisure you'll be able to do edits, color correction, frame rate changes, resolution upscaling, stabilization, etc. etc.. and transcode the .DV file over to another format (MP4, etc..) that you prefer etc.
Make sure the camcorder is ON and the switch is set to PLAY / VTR mode (not record mode).
Insert your first tape, rewind it fully and then issue the command below in the terminal app and hit PLAY on the Camcorder immediately.
NOTE: Please replace "DCR-TRV103" with the actual name you saw and copied down of your camcorder in Check to See if It Works step above. Also you can change name of output DV file to what ever you want in command below.
Command to be issued from Terminal on your Mac:
ffmpeg -f avfoundation -capture_raw_data true -I "DCR-TRV103" -c copy -map 0 -f rawvideo tape_1_capture_video.dv
In the above command:
- -i "DCR-TVR103" selects the input device
- -c copy tells the ffmpeg program to NOT re-encode the file into some lossy format but instead keep it full quality
- -map 0 parameter tells ffmpeg to save all streams of data (video and audio) as is coming off the camcorder
- -f rawvideo tells ffmpeg program that the video stream is raw data
- tape_1_capture_video.dv is the file name it will be saved as (feel free to use any name with .dv as the file name extension ending)
This will take a long time. As long as the tape is in minutes. So a 60 min tape will take 60 mins, etc.. as it is playing the tape in real time.
Post Capture:
Now you've captured one or more of your tapes over to your Mac you can decide how you want to edit / correct / split into segments or join various portions, stabilize, color correct, etc. etc. and what format you want to save your corrected video clip(s) as.
You can use Final Cut or iMovie or Davinci Resolve, or a multitude of other applications.
Or you can even look at just using:
MPV -
https://mpv.io
ShotCut -
https://www.shotcut.org
Lossless Cut -
https://mifi.github.io/lossless-cut/
Shutter Encoder -
https://www.shutterencoder.com/en/
Personally I found the following useful for my quick workflow:
1. Do above to capture all tapes into DV format on Mac
2. View a tape's DV file and note down in a spreadsheet the start and end time for every segment I want to split out into a new file. Also note down any notes on the people in the video segment, a small description and if I want to do something regarding how bright or under / over saturated the video is.
NOTE: You can also adjust many other parameters besides those and can actually even pass Adobe Photoshop Curves values or a photoshop ACV file. For example extract a video frame from a video segment as a PNG image file to use in Photoshop where you can make adjustments via curves. For example, to extract an image (PNG) that you will adjust in Photoshop later from a video at the 16 second point into the video file issue the following command:
ffmpeg -ss 0:00:16 -I tape_1_video.dv -frames:v 1 output.png
Then:
- Open in Photoshop the PNG file from above - output.png and adjust the CURVES and save the curves adjustment to a curves preference file - that ends in ACV
- Pass the acv curves file to adjust entire video segment to that
- curves= setting for ffmpeg to use in the -filter: parameter. i.e. curves=psfile=tape_1_video_at_16_second_mark_curves_file_from_Photoshop.acv
- Google above for more help if you want to use it in step 4 below.
Another way to do curves adjustments is directly by specifying the adjustments individually in ffmpeg filter command like above but not referencing a file but instead the individual curve adjustments. Shotcut App or Shutter Encoder App above may make it easier to view and see the various curve adjustments values for ffmpeg.
3. I used MPV Player to view the original DV file with a script to fire it up to jump directly to the start of each video segment based on values I recorded in the spreadsheet with commands mapped into the keyboard so I could increase/decrease the GAMMA (brightness adjustments) and the Saturation settings to see how it would look. Based on adjustments made I would note down in my spreadsheet the gamma and saturation settings I settled on for that segment.
4. Then I ran a script that issued ffmpeg command to create corrected / edited / etc.. H264 MP4 encoded video segment files from the original DV file(s). The ffmpeg command for each segment was something similar to below:
ffmpeg -loglevel error -stats \
-ss 0:49:24 -to 0:51:14 \
-i tape_1_capture_video.dv \
-map 0:0 \
-filter:v eq=saturation=1.1:gamma=1.6,bwdif,scale=w=-2:h=720 \
-c:v h264_videotoolbox -b:v 5000k \
-color_primaries:v bt709 -color_trc:v bt709 -colorspace:v bt709 \
-aspect 4:3 \
-map 0:1 -c:a:0 aac_at -aac_at_mode:a:0 cvbr -ar:a:0 48000 \
-sn \
-movflags disable_chpl \
-movflags +faststart \
-metadata title='Title of the Video Segment' \
-metadata description='A verbose desription of the video segment - i.e. the people and what was happening etc.' \
REENCODED_CORRECTED_SEGMENT_OUTPUTFILENAME.mp4
In the above command:
-ss gives the start to end time of the video segment I want to extract and re-encode into H264
-i the input file name of the original DV file
-map 0:0 - video stream from DV file
- filter line - bumping saturation to 1.1 and brightening via changing the gamma to 1.6. bwdif is to de-interlace the video and extrapolate upscale to 720p res
-c:v is directing ffmpeg to use the (not that great but it is faster while using more space) video toolbox h264 encoder and the hardware capabilities of the M1 chipsets instructions to speed up the process
-b:v 5000 is for a higher bit rate for improving the quality of the lossy encode (prob too high but I am fine with it). Make it a smaller number and you'll get a smaller file and might not be as good quality -- you can experiment.
-aspect command to ensure it maintains original ratio (might not be needed but I kept it in)
-map 0:1 and associated parameters are to re-encode the DV files audio data stream to AAC at 48K
REENCODED_CORRECTED_SEGMENT_OUTPUTFILENAME.mp4 - The filename to save the re-encode to