Hi All,
Long-time Mac tinkerer and collector here. I recently picked up a lot of 6 2015 rMBP with mixed specs, and intend to dish out at Christmas time to a few family members in need of casual, light-use machines. First, however, I had to do some maintenance - swapping boards to pair better specs with better condition displays, reapplying thermal paste, fresh OS installs, etc.
Over the years fixing, upgrading, and restoring Macs, one thing I always dread is buying aftermarket batteries. They're not exactly a fun challenge to replace, don't offer any performance benefits, and are rather tedious to replace on newer models thanks to the glue. Oftentimes they don't fit well or have quirks, and almost all of them turn to crap capacity-wise after 1 year.
Thankfully, many units in this lot had their batteries replaced by Apple at some point in the 2018-2019 timeframe. However, seemingly immediately afterwards, they were placed into storage by the previous owner (a company) - possibly due to the pandemic. I guess I'll never know.
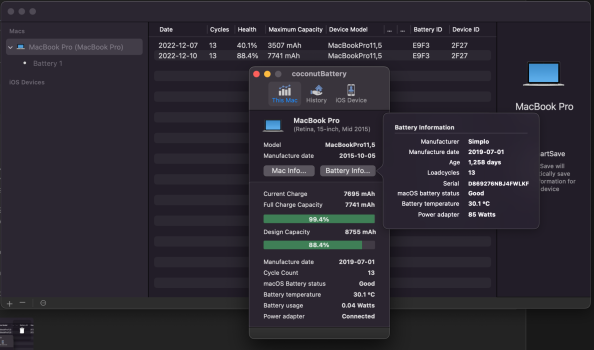
Out of the 6, one machine I may keep for myself is a 15" 2.8GHz i7 w/ dual graphics. The only downside? The OEM Simplo battery was in really ruddy condition, showing 40% of original capacity and the "service battery" recommendation in the menu bar and system profiler.
So, before going through he headache of looking for a replacement, I figured I'd give the old-new battery the good-old defibrillator treatment - AKA, calibrate the battery.
There are a few proposed ways of doing this, but the way I've always done it is as follows:
I've done this numerous times, but never seen a result this good. I think it must have something to do with the units going into storage for a while, but that's just a hunch. I'll probably do this on a few of the 13" from the lot, some of which are at 70-80% of original capacity, and see what difference it makes. With those, I'll take screenshots of the whole coconut battery screen so there's a bit more than just the "History" section.
Anyway, don't forget to try this before giving up on your battery! I've managed to extend the life of many batteries (both from a capacity perspective and landfill perspective), as well as resurrect completely dead batteries in units with removable batteries (iBooks, OG MacBooks, etc).
Long-time Mac tinkerer and collector here. I recently picked up a lot of 6 2015 rMBP with mixed specs, and intend to dish out at Christmas time to a few family members in need of casual, light-use machines. First, however, I had to do some maintenance - swapping boards to pair better specs with better condition displays, reapplying thermal paste, fresh OS installs, etc.
Over the years fixing, upgrading, and restoring Macs, one thing I always dread is buying aftermarket batteries. They're not exactly a fun challenge to replace, don't offer any performance benefits, and are rather tedious to replace on newer models thanks to the glue. Oftentimes they don't fit well or have quirks, and almost all of them turn to crap capacity-wise after 1 year.
Thankfully, many units in this lot had their batteries replaced by Apple at some point in the 2018-2019 timeframe. However, seemingly immediately afterwards, they were placed into storage by the previous owner (a company) - possibly due to the pandemic. I guess I'll never know.
Out of the 6, one machine I may keep for myself is a 15" 2.8GHz i7 w/ dual graphics. The only downside? The OEM Simplo battery was in really ruddy condition, showing 40% of original capacity and the "service battery" recommendation in the menu bar and system profiler.
So, before going through he headache of looking for a replacement, I figured I'd give the old-new battery the good-old defibrillator treatment - AKA, calibrate the battery.
There are a few proposed ways of doing this, but the way I've always done it is as follows:
- Start with a fully charged battery.
- Turn off power saving features such as sleep and screen sleep.
- Fall asleep to YouTube - draining the battery down to 0 overnight, and waking up to a totally dead MacBook.
- Reset the SMC while unplugged, 2 times for good measure because I'm neurotic. Ctrl-Opt-Shift + Power Button for 10 sec
- Plug in the unit and immediately reset the SMC - the charger light should stay green for as long as you're holding down the key combo, and then turn to amber once you release.
- Do nothing. Allow the MacBook to sit and charge to 100%. Do not turn the unit on or unplug it during this charge.
- Once the light has turned green (god, I love MagSafe), boot the computer, and inspect results.
I've done this numerous times, but never seen a result this good. I think it must have something to do with the units going into storage for a while, but that's just a hunch. I'll probably do this on a few of the 13" from the lot, some of which are at 70-80% of original capacity, and see what difference it makes. With those, I'll take screenshots of the whole coconut battery screen so there's a bit more than just the "History" section.
Anyway, don't forget to try this before giving up on your battery! I've managed to extend the life of many batteries (both from a capacity perspective and landfill perspective), as well as resurrect completely dead batteries in units with removable batteries (iBooks, OG MacBooks, etc).
Attachments
Last edited: