Hello everybody
Is possible to do the same with Radeon HD 6770M 512mb on an iMac 2011 intel i7 2.8ghz , 20 gb of ram?
Is possible to do the same with Radeon HD 6770M 512mb on an iMac 2011 intel i7 2.8ghz , 20 gb of ram?
Hey guys, I'm happy to report that after long struggles with trying to find a PERMANENT fix for this crappy GPU I finally found one that works like a charm! Now I can restart my MBP and it will boot normally by using the Intel GPU rather than the faulty AMD GPU and I no longer have to bring it back to life after each restart!
Hey guys, I'm happy to report that after long struggles with trying to find a PERMANENT fix for this crappy GPU I finally found one that works like a charm! Now I can restart my MBP and it will boot normally by using the Intel GPU rather than the faulty AMD GPU and I no longer have to bring it back to life after each restart!
Below I'm sharing the exact steps I followed and I hope it can help someone else as well.
First of all, many thanks to @jaynaland for pointing me into the right direction and then @MacTinkerer2011Fan-Pun for his continual help.
I have a 15" late-2011 MBP and I'm on High Sierra 10.13.6 (with Security Update 2020-003 installed). (This would probably also work with Security Updates 004 or 002 etc. but can't say for sure, though.)
I mostly followed the procedure by arhirienko from GitHub, though I had to add some of my own tweaks in order to really make it work. It is a very straight-forward manual, but please make sure to follow the instructions very closely and to type the commands precisely:
It will show a bunch of text in the screen (don't be alarmed, let it finish) and then it will restart again. On the second restart it will show a bunch of text in the screen again and then it will show normal login screen and your computer now should work properly.
- Reset SMC. (Shutdown your MBP, unplug everything except charging cable and hold leftShift + Ctrl + Option + Power for about 15 secs. Then let go and you should see the the light on the charging dongle flash once.)
- Reset PRAM. (Turn on your MBP and immediately hold Command + Option + P + R buttons. Hold it until you hear the chime at least 2 times.
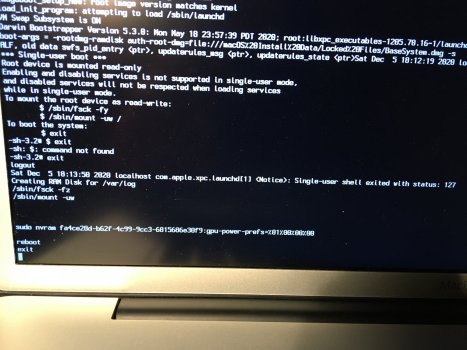
- Shut down your MBP and turn it on again and then boot using Command + S.
- Manually type nvram fa4ce28d-b62f-4c99-9cc3-6815686e30f9:gpu-power-prefs=%01%00%00%00 and run it.
- Manually type nvram boot-args="-v" and run it.
- Manually type reboot and run it.
- Boot using Command + R (this may take a bit longer for the progress bar with Apple logo to boot).
- Go to Utilities in the menu bar above and open Terminal.
- Disable SIP: manually type csrutil disable and run it.
- Manually type nvram fa4ce28d-b62f-4c99-9cc3-6815686e30f9:gpu-power-prefs=%01%00%00%00 and run it.
- Manually type nvram boot-args="-v" and run it.
- Manually type reboot and run it.
- Boot using Command + S.
- Manually type /sbin/mount -uw / and run it.
- Manually type mkdir -p /System/Library/Extensions-off and run it.
- Manually type mv /System/Library/Extensions/AMDRadeonX3000.kext /System/Library/Extensions-off/ and run it.
****CAVEAT: in my case the step no. 16 didn't work properly and I kept getting the following message: ... “Directory not empty”. For some reason I had the AMDRadeonX3000.kext file both in Extensions and Extensions-off folder when ideally the kext file should be only in the Extensions folder and by running step no. 16 you'd move this kext file into the Extensions-off folder. So what I had to do was force-delete the kext file from my Extensions-off folder in order to be able to successfully move it there from the Extensions folder.
So, if you get the “Directory not empty” message after running step no. 16, using the following command to force-delete the kext from Extensions-off folder helped in my case:
Manually type rm -rf /System/Library/Extensions-off/AMDRadeonX3000.kext and run it.
Then repeat step no. 16.- Manually type touch /System/Library/Extensions/ and run it.
- Manually type reboot and run it.
Once your MBP is up and running again, you will now be able to shutdown/restart your MBP without fears of it not booting again.
One last thing to do is to turn off the verbose mode (ie. a bunch of text showing up on the screen when you restart your MBP), so follow these steps:
1. Restart your MBP and boot using Command + R.
2. Go to Utilities in the menu bar above and open Terminal.
3. Manually type nvram boot-args=" agc=0" and run it.
4. Manually type reboot and run it.
And you're good to go!
PS: it is advisable not to do any system updates after this anymore because it will likely result in having to do the whole procedure again!
As per GitHub:
If an update that contains changes to the AMD drivers is about to take place it is advisable to move back the AMDRadeonX3000.kext to its default location before the update process. Otherwise the updater writes at least another kext of a different version to its default location or at worst you end up with an undefined state of partially non-matching drivers.
After any system update the folder /System/Library/Extensions has to be checked for the offending kext. Its presence there will lead to e.g. a boot hang on Yosemite and Sierra, an overheating boot-loop in High Sierra.
Ok so I have a Macbook 2011 that I'm trying to install a new SSD drive in... before discovering this thread I had actually tried the steps here:

GPU problem - Boot Hangs on Grey Screen
I found this according to my problem in this thread: Boot hangs on grey screen (even when booting from USB drive with fresh OS X install) My MacBook Pro 15" Early 2011 with AMD Radeon HD 6750M exh...apple.stackexchange.com
But I'm guessing I probably screwed something up since I am a newbie. When I restart I get this screwed up pixelated screen. You can tell that it's loading but then after awhile it turns into a black screen.

I then try to reboot from USB (High Sierra) which is possible and it doesn't have the screwed up pixelated screen, and use the steps from the first page:
nvram fa4ce28d-b62f-4c99-9cc3-6815686e30f9:gpu-power-prefs=%01%00%00%00
nvram boot-args="-v"
reboot
But after rebooting it keeps rebooting from the USB and not from the hard drive (even when I choose it as the startup drive). I should note that during restarting I get a black screen with a lot of text which look like errors.

*Update, ok so I took out the USB an tried rebooting and now all I get is the question mark folder.
I've remained in 10.11.6 (15G1510, since I'm afraid to update to the latest 15G22010 and have it be unbootable) for several years after my Early-2011 GPU died and I disabled it on EFI, and have been living without being able to put the laptop to sleep (executing halt every day after finishing work).
But now a few problems are starting to compound, like iWork and other software phasing out support for 10.11 and the COMODO root certs not being updated on Safari 11.1, and I'm wondering if it's possible to upgrade to 10.12.6 Sierra, or maybe even 10.13.6 High Sierra, the latest OS supported by my model...
I don't mind making a backup and wiping my hard drive to perform a clean install and then do a file restore. Does anyone know if there's a guide I could follow to do it? And also if there are any known issues on 10.12 and 10.13 like the sleep crash on El Cap?
Thanks in advance!
Hello john, I have followed the exact same steps but my brightness keys still don't work (though i have no sleep problems) and i don't know what else to do. Thanks in advanceHey guys, I'm happy to report that after long struggles with trying to find a PERMANENT fix for this crappy GPU I finally found one that works like a charm! Now I can restart my MBP and it will boot normally by using the Intel GPU rather than the faulty AMD GPU and I no longer have to bring it back to life after each restart!
Below I'm sharing the exact steps I followed and I hope it can help someone else as well.
First of all, many thanks to @jaynaland for pointing me into the right direction and then @MacTinkerer2011Fan-Pun for his continual help.
I have a 15" late-2011 MBP and I'm on High Sierra 10.13.6 (with Security Update 2020-003 installed). (This would probably also work with Security Updates 004 or 002 etc. but can't say for sure, though.)
I mostly followed the procedure by arhirienko from GitHub, though I had to add some of my own tweaks in order to really make it work. It is a very straight-forward manual, but please make sure to follow the instructions very closely and to type the commands precisely:
It will show a bunch of text in the screen (don't be alarmed, let it finish) and then it will restart again. On the second restart it will show a bunch of text in the screen again and then it will show normal login screen and your computer now should work properly.
- Reset SMC. (Shutdown your MBP, unplug everything except charging cable and hold leftShift + Ctrl + Option + Power for about 15 secs. Then let go and you should see the the light on the charging dongle flash once.)
- Reset PRAM. (Turn on your MBP and immediately hold Command + Option + P + R buttons. Hold it until you hear the chime at least 2 times.
- Shut down your MBP and turn it on again and then boot using Command + S.
- Manually type nvram fa4ce28d-b62f-4c99-9cc3-6815686e30f9:gpu-power-prefs=%01%00%00%00 and run it.
- Manually type nvram boot-args="-v" and run it.
- Manually type reboot and run it.
- Boot using Command + R (this may take a bit longer for the progress bar with Apple logo to boot).
- Go to Utilities in the menu bar above and open Terminal.
- Disable SIP: manually type csrutil disable and run it.
- Manually type nvram fa4ce28d-b62f-4c99-9cc3-6815686e30f9:gpu-power-prefs=%01%00%00%00 and run it.
- Manually type nvram boot-args="-v" and run it.
- Manually type reboot and run it.
- Boot using Command + S.
- Manually type /sbin/mount -uw / and run it.
- Manually type mkdir -p /System/Library/Extensions-off and run it.
- Manually type mv /System/Library/Extensions/AMDRadeonX3000.kext /System/Library/Extensions-off/ and run it.
****CAVEAT: in my case the step no. 16 didn't work properly and I kept getting the following message: ... “Directory not empty”. For some reason I had the AMDRadeonX3000.kext file both in Extensions and Extensions-off folder when ideally the kext file should be only in the Extensions folder and by running step no. 16 you'd move this kext file into the Extensions-off folder. So what I had to do was force-delete the kext file from my Extensions-off folder in order to be able to successfully move it there from the Extensions folder.
So, if you get the “Directory not empty” message after running step no. 16, using the following command to force-delete the kext from Extensions-off folder helped in my case:
Manually type rm -rf /System/Library/Extensions-off/AMDRadeonX3000.kext and run it.
Then repeat step no. 16.- Manually type touch /System/Library/Extensions/ and run it.
- Manually type reboot and run it.
Once your MBP is up and running again, you will now be able to shutdown/restart your MBP without fears of it not booting again.
One last thing to do is to turn off the verbose mode (ie. a bunch of text showing up on the screen when you restart your MBP), so follow these steps:
1. Restart your MBP and boot using Command + R.
2. Go to Utilities in the menu bar above and open Terminal.
3. Manually type nvram boot-args=" agc=0" and run it.
4. Manually type reboot and run it.
And you're good to go!
PS: it is advisable not to do any system updates after this anymore because it will likely result in having to do the whole procedure again!
As per GitHub:
If an update that contains changes to the AMD drivers is about to take place it is advisable to move back the AMDRadeonX3000.kext to its default location before the update process. Otherwise the updater writes at least another kext of a different version to its default location or at worst you end up with an undefined state of partially non-matching drivers.
After any system update the folder /System/Library/Extensions has to be checked for the offending kext. Its presence there will lead to e.g. a boot hang on Yosemite and Sierra, an overheating boot-loop in High Sierra.
Sorry, I never experienced problems with brightness keys so I don’t know how to help you in this case... :/Hello john, I have followed the exact same steps but my brightness keys still don't work (though i have no sleep problems) and i don't know what else to do. Thanks in advance
Hey guys, not sure if anyone is still monitoring this thread.
I downloaded the RealMacMods fix for the AMD GPU EFI variable and removed the R8911 resistor. My MBP late 2011 is now working great. Thanks to Adam at RealMacMods.
My question is: say I do the fix again on another machine. Then I wipe the SSD for a new user. Does the modification hold? Is the coding change within the OS, or is it in a deeper part of the machine that does not get affected when the SSD is reformatted, or OS is upgraded? (I understand that with this mod, High Sierra has an issue with dimming and going to sleep mode) But what if I were to then upgrade to Mojave or Catalina. Was the dimmer (F1/F2) issue resolved on OS later than High Sierra? or is (regular)Sierra the most recent OS that keeps everything functioning "normally?" Thank you.
I installed and reinstalled multiple mac os on my machines( I have four of them to mess with) and they will not lose the settings if u swap out hard drives etc. You will have to reapply if u do a pram reset it reset smc.Yes, when you wipe the ssd and install the macOS in there you will lose the software modification and should reapply it but i don't know if you also did the hardware modification.
Actually there is another approach to disable the dgpu. I tried this method on high sierra and later i upgrade to the catalina using dosdude's patcher. All works well including brightness controll and close/open lid from sleep mode without any hardware modification.
These instructions were the best fix for me. Thanks Jon08!Hey guys, I'm happy to report that after long struggles with trying to find a PERMANENT fix for this crappy GPU I finally found one that works like a charm! Now I can restart my MBP and it will boot normally by using the Intel GPU rather than the faulty AMD GPU and I no longer have to bring it back to life after each restart!
Below I'm sharing the exact steps I followed and I hope it can help someone else as well.
First of all, many thanks to @jaynaland for pointing me into the right direction and then @MacTinkerer2011Fan-Pun for his continual help.
I have a 15" late-2011 MBP and I'm on High Sierra 10.13.6 (with Security Update 2020-003 installed). (This would probably also work with Security Updates 004 or 002 etc. but can't say for sure, though.)
I mostly followed the procedure by arhirienko from GitHub, though I had to add some of my own tweaks in order to really make it work. It is a very straight-forward manual, but please make sure to follow the instructions very closely and to type the commands precisely:
It will show a bunch of text in the screen (don't be alarmed, let it finish) and then it will restart again. On the second restart it will show a bunch of text in the screen again and then it will show normal login screen and your computer now should work properly.
- Reset SMC. (Shutdown your MBP, unplug everything except charging cable and hold leftShift + Ctrl + Option + Power for about 15 secs. Then let go and you should see the the light on the charging dongle flash once.)
- Reset PRAM. (Turn on your MBP and immediately hold Command + Option + P + R buttons. Hold it until you hear the chime at least 2 times.
- Shut down your MBP and turn it on again and then boot using Command + S.
- Manually type nvram fa4ce28d-b62f-4c99-9cc3-6815686e30f9:gpu-power-prefs=%01%00%00%00 and run it.
- Manually type nvram boot-args="-v" and run it.
- Manually type reboot and run it.
- Boot using Command + R (this may take a bit longer for the progress bar with Apple logo to boot).
- Go to Utilities in the menu bar above and open Terminal.
- Disable SIP: manually type csrutil disable and run it.
- Manually type nvram fa4ce28d-b62f-4c99-9cc3-6815686e30f9:gpu-power-prefs=%01%00%00%00 and run it.
- Manually type nvram boot-args="-v" and run it.
- Manually type reboot and run it.
- Boot using Command + S.
- Manually type /sbin/mount -uw / and run it.
- Manually type mkdir -p /System/Library/Extensions-off and run it.
- Manually type mv /System/Library/Extensions/AMDRadeonX3000.kext /System/Library/Extensions-off/ and run it.
****CAVEAT: in my case the step no. 16 didn't work properly and I kept getting the following message: ... “Directory not empty”. For some reason I had the AMDRadeonX3000.kext file both in Extensions and Extensions-off folder when ideally the kext file should be only in the Extensions folder and by running step no. 16 you'd move this kext file into the Extensions-off folder. So what I had to do was force-delete the kext file from my Extensions-off folder in order to be able to successfully move it there from the Extensions folder.
So, if you get the “Directory not empty” message after running step no. 16, using the following command to force-delete the kext from Extensions-off folder helped in my case:
Manually type rm -rf /System/Library/Extensions-off/AMDRadeonX3000.kext and run it.
Then repeat step no. 16.- Manually type touch /System/Library/Extensions/ and run it.
- Manually type reboot and run it.
Once your MBP is up and running again, you will now be able to shutdown/restart your MBP without fears of it not booting again.
One last thing to do is to turn off the verbose mode (ie. a bunch of text showing up on the screen when you restart your MBP), so follow these steps:
1. Restart your MBP and boot using Command + R.
2. Go to Utilities in the menu bar above and open Terminal.
3. Manually type nvram boot-args=" agc=0" and run it.
4. Manually type reboot and run it.
And you're good to go!
PS: it is advisable not to do any system updates after this anymore because it will likely result in having to do the whole procedure again!
As per GitHub:
If an update that contains changes to the AMD drivers is about to take place it is advisable to move back the AMDRadeonX3000.kext to its default location before the update process. Otherwise the updater writes at least another kext of a different version to its default location or at worst you end up with an undefined state of partially non-matching drivers.
After any system update the folder /System/Library/Extensions has to be checked for the offending kext. Its presence there will lead to e.g. a boot hang on Yosemite and Sierra, an overheating boot-loop in High Sierra.
Hello,Try boot Single User Mac OS X (Command + S) then:
sudo nvram fa4ce28d-b62f-4c99-9cc3-6815686e30f9:gpu-power-prefs=%01%00%00%00
reboot
Thanks for the replies but now I am really confused.
pizzaistriangle says basically I would have to reapply the software mod EFI var change - so to get around THAT, he suggested trying the dosdude modification which looks like it is a .kext mod?
boy80: You are saying that my realmacmod way would NOT necessitate a reapply of the mod unless I did a PRAM reset, but I would lose the brightness control.
Who is right
Found this brightness control solution for High Sierra and Mojave
I tested it in High Sierra, works fine

GitHub - stecker870/MacBook-Pro-15-Zoll-late-2011-Graphics-Card-Fix-: Screen brightness control for MacBook Pro (15 Zoll, late 2011) Graphics Card Fix
Screen brightness control for MacBook Pro (15 Zoll, late 2011) Graphics Card Fix - GitHub - stecker870/MacBook-Pro-15-Zoll-late-2011-Graphics-Card-Fix-: Screen brightness control for MacBook Pro (...github.com
EDIT: and also I have the wake after sleep working ok!!
I don't know if that is because the above fix, or because I prior removed the AMD X3000 kext...

I have the same symptom on the MBP 15 "i7 Late 2011 820-915-B, everything is displayed more blue. For now I set the standard LCD profile, but this is not the color I had before disconnecting the AMD GPU. I found a tip in some thread to convert two resistors to 0R, but that was for MBP 17 ". Maybe one of the colleagues will suggest a solution.I've encountered a problem with High Sierra and I need to know if someone got things working:
I started noticing issues with Quick Look and Preview, showing black rectangles where content and PDF pages should be.
I googled and found that it appeared to be related to an issue with the display color profiles and that it could be remediated doing a calibration of the display profile.
I "calibrated" the display, but actually did nothing: I was only asked to set a new white point, but I left it just the same as the original color profile. After completing the process, everything was now light blue, and although the Quick Look and Preview issues were gone, there's no point in having a medicine being worse than the disease.
Not even fiddling with the white point can bring my display to the tone I had.
Has anyone else encountered this problem and fixed it properly? I'd really appreciate the help!