Become a MacRumors Supporter for $50/year with no ads, ability to filter front page stories, and private forums.
MBP 1,1-10,2 Force 2011 MacBook Pro 8,2 with failed AMD GPU to ALWAYS use Intel integrated GPU (EFI variable fix)
- Thread starter AppleMacFinder
- Start date
-
- Tags
- a1286 amd black screen blue and black screen discrete graphics dmg dmg files gfxcardstatus glitching gpu failure gpu panic gpu switch graphic card hardware fault hardware issue logic board failure macbook pro "15 2011 macbook pro (15-inch early 2011) macbook pro 2011 radeongate restart loop white screen
- Sort by reaction score
You are using an out of date browser. It may not display this or other websites correctly.
You should upgrade or use an alternative browser.
You should upgrade or use an alternative browser.
Interestingly, with the AMD6000Controller kext loaded, the dGPU actually draws less power (this is according to iStat Menus). This adds to my confusion regarding why it was necessary to remove it.
Hey all - I have a failed 2011 MBP, and I'm currently using the Grub solution on Sierra, which powers off the dGPU, and the wake handler to keep it powered down after waking from sleep. It's worked 100% reliably for me, and has been great.
For software compatibility reasons I'm investigating the move to High Sierra.
I've installed a test system using the guide on p35 (thanks for that!) and it's giving me a fresh working HS system (brightness controls work, and no problems with sleep/wake). As I understand it, with this solution, the dGPU stays powered on, and visible to the system.
In this case, with the old system before the dGPU was powered down, some graphics apps, specifically Photoshop, crashed even when the gpu was locked to iGPU. Might this still be a problem with the HS solution the guide outlines?
(I will be testing this stuff in due course, but it requires installing stuff etc, and I'm combing through this thread bit by bit as well.)
As I understand it, if I go back to the grub solution with HS, the dGPU can be powered down (which is better for me - not so much for battery life but certainly to help with temperature), but there are problems such as losing the brightness controls. I think there are some mods which attempt to bring these back with a powered down dGPU, but the reliability is undetermined at this time from what I can tell.
For those of you running HS - are you mostly using the HS method in the guide, leaving the dGPU powered on? Has this config been stable for you? The main benefit I see from this solution is it doesn't require any special boot handling stuff, so it seems to be simpler overall.
Many thanks,
I've had to use this fix in the past (thank you!), but now I'm at the point where I'm looking to upgrade my MacBook. I would like to sell this laptop, as it's still a great laptop (albeit without a discreet GPU), but it obviously comes with its quirks and I don't want to deal with people trying to get back in touch with me saying I sold them a laptop that keeps breaking.
Has anyone successfully sold one of these affected MacBook Pro's in the past, and if so, how and where?
Thanks
Has anyone successfully sold one of these affected MacBook Pro's in the past, and if so, how and where?
Thanks
Exactly why I specifically got a 2015 pro without discreet graphics. Personally think apple should take these old ones in with failed gpus as partial trade ins and add an additional 20% discount on the newest model with trade in.
You wish, we all wish, because the price of a The new MacBook Pro Apple is giving to you would be less than 20% of the current selling price. We all wish a retina 15” with 16 GB of ram and an 500 GB SSD for around 400-500 USD or one for a 1 TB SSD for just the price that Apple charges for the upgrade to 1 TB, 700-800€.
Dreaming is free... but I’m afraid they will never do it because their policy is to only exchange a defective item for the same model and specs but refurbished. They would not want to do it because it will create a precedent that contradicts the oficial policy. No body in his right mind would want to open that type of can of worms.
Dreaming is free... but I’m afraid they will never do it because their policy is to only exchange a defective item for the same model and specs but refurbished. They would not want to do it because it will create a precedent that contradicts the oficial policy. No body in his right mind would want to open that type of can of worms.
Hi everyone,
First of all many thanks for finding and publishing this fix.
I have been able to go through the steps and disable the dGPU.
However I have been noticing weird behaviour that might be expected.
Google Chrome is constantly flashing horizontal white lines that go from the bottom to the top.
I wanted to make a screenshot to show the problem but it seems that the white flashing line are excluded from the selection I'm making for the screenshot. Super weird.
Finder is also being rendered weirdly.
Firefox is working perfectly fine.
Did anyone encounter this before?
And what could fix this?
Much thanks in advance!
=> screenshot finder
https://www.dropbox.com/s/hizj01fi8wf5sii/Screen Shot 2019-06-28 at 8.24.29 PM.png?dl=0
Hi everyone,
First of all many thanks for finding and publishing this fix.
I have been able to go through the steps and disable the dGPU.
However I have been noticing weird behaviour that might be expected.
Google Chrome is constantly flashing horizontal white lines that go from the bottom to the top.
I wanted to make a screenshot to show the problem but it seems that the white flashing line are excluded from the selection I'm making for the screenshot. Super weird.
Finder is also being rendered weirdly.
Firefox is working perfectly fine.
Did anyone encounter this before?
And what could fix this?
Much thanks in advance!
=> screenshot finder
https://www.dropbox.com/s/hizj01fi8wf5sii/Screen Shot 2019-06-28 at 8.24.29 PM.png?dl=0
I have this problem in High Sierra 10.13.6 a few times.
Finder - open two tabs - move the mouse between the tabs - seems a glitch in the Matrix.
Safari - open two tabs - move the mouse between the tabs - seems a glitch in the Matrix.
I have more than one user account.
One account I have gfxcardstatus 2.4.3i (fork Steve Schow). No problems on tabs.
Another account I do not have gfxcardstatus and I have the tabs problem.
1 - Download gfxcardstatus and unzip.
2 - Copy gfxcardstatus.app to Finder -> Applications
3 - Load gfxcardstatus
4 - i (gfxcardstatus 2.4.3i menu) -> Preferences -> General -> only checked: load gfxcardstatus at startup.
5 - System Preferences -> Energy Saver: checked: Automatic graphics switching
6 - Reboot
7 - System Preferences -> Users & Groups -> your user account -> Login Items -> listed gfxcardstatus.
https://github.com/steveschow/gfxCardStatus
https://github.com/steveschow/gfxCardStatus/releases
https://github.com/steveschow/gfxCardStatus/releases/tag/v2.4.3i
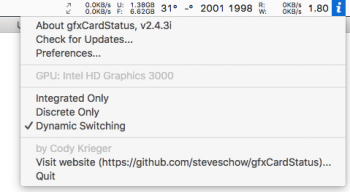
Is it normal for gfxCardStatus to still list the dedicated card as the one being used?
https://www.dropbox.com/s/qdsflz3kssjr1td/Screen Shot 2019-07-03 at 11.04.50 PM.png?dl=0
It's really weird because I'm sure the dedicated card is not active.
The problem is still here. I'm not sure what is causing it.
There is not *one* guide to write up.
...
– make a kext-backup directory
mkdir -p /System/Library/Extensions-off
Greetings,
The above line is where I get into problems; I get a operation not allowed error. CSRUTIL STATUS says enabled even though I disabled SIP (without errors) in Recovery mode. (And I have done this 2X to make sure I didn't make an error.) I am using FileVault but haven't run across any discussion on FileVault causing a problem.
I haven't run across any discussion of SIP errors when trying this procedure but this is a long thread and haven't read everything.
My stats:
MacBook Pro 17" Early-2011
OSX 10.12.6
16GB RAM (not an error -- added 3d party memory years ago without any issues).
Thank you for any consideration,
AEG
Last edited:
Per my post #2587...
With Sierra there is a proviso. SIP will re-enable itself (and thus the operation not permitted errors). When rebooting, use the "reboot" command when in single user mode. Do not use the power button. Found this in the comments section in https://www.igeeksblog.com/how-to-disable-system-integrity-protection-on-mac/
And I am backup and running.
Thank you Mikey N!
AEG
Last edited by a moderator:
My Early-2100 MacBook Pro 17" is now fully up and running thanks to @AppleMacFinder, @MikeyN, @myfrankops, and undoubtedly others whose posts I have read. The instructions I followed were primarily based on @MikeyN 's post #875.
The last hurdle getting the AMDRadeon3000X.kext to load properly; all sorts of errors and weirdness as to wherever I originally moved it to. Finally, it took a restore from an early Time Machine Backup and deleting the original kext I copied to Extensions-off. Once this was done I was able to load the kext after boot. And the loginhooks were created without any issue. One last thing I will do later as @MikeyN recommended, getting a fan control program.
Thanks again -- feel like I dodged a big bullet.
Regards,
AEG
Is it normal for gfxCardStatus to still list the dedicated card as the one being used?
https://www.dropbox.com/s/qdsflz3kssjr1td/Screen Shot 2019-07-03 at 11.04.50 PM.png?dl=0
It's really weird because I'm sure the dedicated card is not active.
The problem is still here. I'm not sure what is causing it.
The "i" must appear in the gfxcardstatus.
I always set to "Dynamic Switching".
Review if AppleMuxControl.kext is loaded.
Code:
kextstat | grep -i applemuxcontrol
com.apple.driver.AppleMuxControl (3.20.15)
Only High Sierra (AGDCDiagnose -a)
IG: Intel GPU
EG: AMD GPU
IG: FB0: on FB1: N/A FB2: N/A 3D: idle HDA : N/A Power: on
EG: FB0: off FB1: off FB2: off 3D: idle HDA: idle Power: off
Code:
/System/Library/Extensions/AppleGraphicsControl.kext/Contents/MacOS/AGDCDiagnose -a
## Mux state - Start ##

System is in Dynamic mode: Better Battery Mode set, using Integrated

gMUX Status: Version: 1.9.23, 3D:2, FB:4

LVDS: IG [DDC: IG], DP: IG [bf, 0]

  IG: FB0:on  FB1:N/A FB2:N/A 3D:idle HDA:N/A  Power:on

  EG: FB0:off FB1:off FB2:off 3D:idle HDA:idle Power:off

Switch Statistics: 0 Switches 0 Errors

Policy:on GPUPowerDown:on Backlight Control:on Recovery:on

Power State Machine IG: 0 EG: 6

StateMachine: 0 [AGC_GPU_IDLE]

gMUX Status: Version: 1.9.23 LVDS: IG [DDC: IG], DP: IG
ioreg - ActiveGPU: IGPU (IntelGPU)
Code:
ioreg -lw0 | grep -i activegpu

    | |   |   "ActiveGPU" = "IGPU"
Make sure you do not put anything in boot-args for agc.
I use only the verbose boot (-v).
Code:
nvram boot-args

boot-args    -v
My upload photo (IstatMenu 5.2 - idle mode - Celsius degree):
31˚: CPU Die Analog
_˚ or zero: GPU Die Analog (cold weather)
Update 1:
AMD GPU power off after kextload AMDRadeonX3000.kext
Attachments
Last edited:
Download MacOS Sierra 10.12.1 Update (1.36 GB). And make a second copy of this Update.
Do not do any installation.
After I explain. Still doing tests but very promising. I do not know if Apple will remove this MacOS Sierra 10.12.1 Update from Apple's website.
Yes, if you have Sierra (10.12) and / or High Sierra (10.13), download MacOS Sierra 10.12.1 Update because it works for both systems above.
Download macOS Sierra 10.12.1 Update - Post Date: Oct 27, 2016
https://support.apple.com/kb/DL1897?viewlocale=en_US&locale=en_US
Last edited:
this works also with Mac Mini mid 2011 having a AMD gpu . AMD gpu was giving symptoms of blue screen / high heat post graphic stress, white screen freeze on boot, or black screen freeze on shut down
sIf you don't have time to read my story (which also describes some interesting technical approaches) just scroll down this thread until a "100% WORKING SOLUTION" text
Discrete AMD GPU of my 2011 MacBook Pro 8,2 has finally failed because of the reasons mentioned here ( http://logicboardmac.blogspot.ru/ ) and there ( https://www.macrumors.com/2015/02/19/2011-macbook-pro-repair-program-apple/ ) . It has been working perfectly for 6 years under quite a high load, even tried SETI@HOME mining at background! So I was confident that my MBP is not affected by bad solder / bad soldering quality and didn't want to bring it to Apple for a free repair program - partially because couldn't find the time to pause my important software projects, partially because I was afraid that Apple might give me a less reliable logic board or refuse a free repair because of the several unrelated repairs that I did manually by myself earlier to save money: changed thermal paste a few times, replaced the internal battery 2 times, replaced a keyboard with broken buttons, etc. But it finally broke down last week: laptop's screen image became distorted, it refused to boot OS X (always freezing half-way), and - Apple free repair program has already ended! I know there are affordable solutions like $50 BGA resoldering at unofficial local repair shop and that its possible to get a new replacement HD 6750M chip from AliExpress for $35 or cheaper ( http://www.aliexpress.com/item/DC-2...0028-216-0810028-BGA-Chipset/32764872143.html or https://www.aliexpress.com/item/DC-2015-New-216-0810001-216-0810001-Graphic-Chipset/32718112928.html , because don't know if this is true - https://www.rossmanngroup.com/board...0604-replace-216-0810005-gpu-with-216-0810028 ) to guarantee a successful repair, so the total price of repair would be either $50 or $50+$35=$85 - less than $100 in any case. But I don't like investing money to the old computers, so I have thought - what if there is some hack to force MBP to use integrated graphics ALL THE TIME, even while booting ? And then started to explore the possible solutions...
===
First of all, it is possible to successfully boot a MBP to OS X while still using the failed GPU, after you remove the AMD drivers by booting in command line mode (CMD+S) and entering these commands:
1) fsck -fy (to check a disk)
2) mount -uw / (mount a root filesystem with read/write permissions)
3) sudo mkdir /AMD_Kexts/ (make a directory to store the AMD drivers in case you'll need them in future)
4) sudo mv /System/Library/Extensions/AMD*.* /AMD_Kexts/ (move the AMD drivers)
5) sudo rm -rf /System/Library/Caches/com.apple.kext.caches/ (remove the AMD drivers cache)
6) sudo mkdir /System/Library/Caches/com.apple.kext.caches/ (just in case OS X will be dumb and will not recreate this directory, I am creating it for OS X)
7) sudo touch /System/Library/Extensions/ (to update the timestamps so that new driver caches - without AMD drivers - will be definitely rebuilt)
8) sudo umount / (umount a partition to guarantee that your changes are flushed to it)
9) sudo reboot
The degree of your inconvenience while doing these steps - strongly depends on how heavily a screen's image is distorted in your case. In my case it was even more difficult because the OS X partition became a "read-only" partition (because of too many emergency shutdowns I did while desperately trying to boot OS X with a failed GPU) so I had to remove a hard drive from MacBook Pro and (using a USB to SATA 2.5" adapter taken from my portable HDD) attached it to a computer with Linux, then followed these instructions:
https://superuser.com/questions/961401/mounting-hfs-partition-on-arch-linux (1st answer) - carefully executed a number of commands, calculated a sizelimit for my parition layout, and finally ran sudo mount -t hfsplus -o force,rw,sizelimit=YOURNUMBER /dev/sdb2 /mnt to mount this HFS+ partition to /mnt directory in read-write mode. Then I performed these "1)-7)" steps you see above, and also repaired a filesystem by running sudo fsck.hfsplus -f /dev/sdb2 before unmounting a partition with sudo umount /mnt and putting a hard drive back to MBP...
===
This gave me a MBP which could boot to OS X although STILL using a broken AMD GPU: so it screen's image is very distorted (could browse the Internet but quite inconvenient to read a text), Launchpad is super laggy, and you can't switch to Integrated GPU using gfxCardStatus because: without AMD drivers (which we had to remove to successfully boot to OS X) Macbook Pro thinks its' internal screen is External Display and gfxCardStatus tells it is impossible to switch because External Display is using AMD GPU. Somewhere I found a suggestion that it is possible to rebuild a gfxCardStatus from the source code - https://github.com/codykrieger/gfxCardStatus - with removed or commented out 156-166 lines in the ./gfxCardStatus/Classes/GSProcess.m to make it to ignore the external display:
// find out if an external monitor is forcing the discrete gpu on
CGDirectDisplayID displays[8];
CGDisplayCount displayCount = 0;
if (CGGetOnlineDisplayList(8, displays, &displayCount) == noErr) {
for (int i = 0; i < displayCount; i++) {
if ( ! CGDisplayIsBuiltin(displays))
[list addObject:[NSDictionary dictionaryWithObjectsAndKeys:
Str(@"External Display"), kTaskItemName,
@"", kTaskItemPID, nil]];
}
}
So I rebuilt a gfxCardStatus using the instructions from the last reply of this issue -
https://github.com/codykrieger/gfxCardStatus/issues/229
(also had to download a MacOSX10.11.sdk from here - https://github.com/phracker/MacOSX-SDKs/releases - unpack and copy it to XCode's /Applications/Xcode.app/Contents/Developer/Platforms/MacOSX.platform/Developer/SDKs/MacOSX10.11.sdk - because of the Apple's stupidity the latest XCode for El Capitan does not include SDK for El Capitan!) However, it still didn't work - gfxCardStatus only pretended that it has switched to Integrated GPU, while in reality OS X did not let it switch! Even after I edited ./gfxCardStatus/Classes/GSGPU.m file to enable the mysterious "Nuke it from orbit switching" option, it still couldn't switch...
===
Then I discovered this interesting repository - https://github.com/0xbb/gpu-switch - which is partially similar by its' source code to gfxCardStatus but also has the "Login Hooks" (install_hooks.sh) to "automate the switching process for login/logout". Sadly it didn't work for me... However, there is a very interesting gpu-switch text file right at the root of this repository, which describes the EFI variables!
https://github.com/0xbb/gpu-switch/blob/master/gpu-switch
After studying it and also reading this issue's comments - https://github.com/0xbb/gpu-switch/issues/11 - I became confident to try this solution, but found out that my MacBook Pro 2011 8,2 with OS X El Capitan 10.11.6 is in a VERY problematic situation:
1) rEFInd is not installed, and to install it - must disable SIP protection. But I cannot boot to Recovery mode (Command+Option+R) or to OS X Installation DVD/USB (hold Option), (to disable SIP), because they freeze while booting! - although I removed AMD kexts from my system, of course these recovery tools are using AMD kexts integrated to their design. Also cannot use Rootfool hack ( https://github.com/gdbinit/rootfool ) to disable SIP during runtime, because it works only at OS X version older than 10.11.4
2) Tried overheating my Macbook Pro on purpose (forcing CPU usage to 100% and putting it to a tightly closed bag) to force it to shutdown from overheating and then quickly reboot so that Integrated graphics will be enabled during the boot time - making it possible to boot to Recovery. But because of the wonderful high end thermal paste I have applied not so long ago - cannot overheat it even after waiting for a long time! At this point I thought that could either: a) remove AMD kexts from Installation media, or b) to connect MBP's hard drive to a Linux machine again and run a bunch of chmods to remove the SIP flags from the directories mentioned here ( http://apple.stackexchange.com/questions/193368/what-is-the-rootless-feature-in-el-capitan-really ) which could potentially make a system unbootable, or c) to try installing rEFInd to HFS+ partition directly from a Linux machine with root rights because it will bypass SIP --- but have not explored these options, although some of them might have worked...
3) Wanted to boot a Linux LiveCD to edit the EFI variables from there, but no matter what I did: tried booting straight without GRUB option modifications, tried editing GRUB boot options (with "e" key) to add nomodeset / remove quiet splash / or both in every combination , or like suggested in this article ( https://wiki.archlinux.org/index.php/MacBookPro8,1/8,2/8,3_(2011) ) also add i915.modeset=0 radeon.modeset=0 or radeon.modeset=0 i915.modeset=1 i915.lvds_channel_mode=2 ; and then pressed Fn+F10 or Shift+Ctrl+Fn+F10 to boot with these options: but the Linux boot process always failed at different boot stages, no matter what popular user-friendly Linux distribution or what version of it I am trying: tried many releases of Ubuntu / Lubuntu / Fedora , even the old "AMD64 Mac" and "Alternate AMD64 Mac" images, but they always failed - either at the very beginning of boot process (black screen, or a black screen with a blinking or stuck _ character at the left upper corner) or failed at the very end of it - right before it is supposed to show a graphical desktop environment...
Later, totoe_84 wrote that he was able to boot Ubuntu in graphical mode using the following setup for GRUB:
- To disable the AMD graphics card I added the following lines after set gfxpayload=keep
outb 0x728 1
outb 0x710 2
outb 0x740 2
outb 0x750 0(based on https://ubuntuforums.org/showthread.php?t=2157775 )
- Next I added the following after quiet splash
i915.lvds_channel_mode=2 i915.modeset=1 i915.lvds_use_ssc=0
===
Then I remembered that there are not-mainstream Linux distributions for advanced users, which have a LiveCD without any graphical interface: you are dropped to a pure console and you are supposed to install the system along with only those graphical interfaces and software packages / groups of packages which you explicitly select. For example: Arch Linux (https://www.archlinux.org/) and Gentoo Linux (https://gentoo.org/) . Because their LiveCD does not have a graphical interface, they could be booted without a problem to a pure Linux console and there you could edit the EFI variables ! So here is a...
===
=== 100% WORKING SOLUTION
===
=== Force your MBP to ALWAYS use Intel integrated GPU (EFI variable fix)
===
=== to make it great again !
===
1) Create the Arch Linux LiveCD/LiveUSB :
You need a working computer for that and a spare CD/DVD/USB drive. After downloading archlinux-2017.03.01-dual.iso (see the links below) you have to check the integrity of the .ISO file to see if it is not corrupted (avoid I/O error, printf: not found, chattr: not found, etc). After checking the integrity of archlinux-2017.03.01-dual.iso and everything is OK, then you can generate an ArchLinux boot disk.
archlinux-2017.03.01-dual.iso
MD5:
1d25235e7cebe45f93452fbc05a0fb66 archlinux-2017.03.01-dual.iso
SHA1
f426866ca632a35a3eeae8e4080cff25ec8da614 archlinux-2017.03.01-dual.iso
Official website ArchLinux (only Torrent) - See MD5 and SHA1 hash numbers:
https://www.archlinux.org/releng/releases/2017.03.01/
The MD5 and SHA1 of the official ArchLinux website are the same as the mirrors Virtapi.org and Belnet.be. The archlinux-2017.03.01-dual.iso on Virtapi.org and Belnet.be are legitimate.
Virtapi.org:
http://archive.virtapi.org/iso/2017.03.01/
http://archive.virtapi.org/iso/2017.03.01/archlinux-2017.03.01-dual.iso
http://archive.virtapi.org/iso/2017.03.01/md5sums.txt
http://archive.virtapi.org/iso/2017.03.01/sha1sums.txt
Belnet:
http://ftp.belnet.be/pub/archlinux.org/iso/2017.03.01/
http://ftp.belnet.be/pub/archlinux.org/iso/2017.03.01/archlinux-2017.03.01-dual.iso
http://ftp.belnet.be/pub/archlinux.org/iso/2017.03.01/md5sums.txt
http://ftp.belnet.be/pub/archlinux.org/iso/2017.03.01/sha1sums.txt
Check for archlinux-2017.03.01-dual.iso integrity (Mac OS):
Boot in Safe Mode (press SHIFT key at boot) -> no freeze Mac OS -> El Capitan or Sierra.
HighSierra maybe freeze at boot time (Safe Mode). There were changes in the HighSierra in relation to the AMD kexts loaded during the Safe Mode. More tests are needed.
File downloaded -> /Users/Your_User/Downloads/archlinux-2017.03.01-dual.iso
Finder -> Applications -> Utilities -> Terminal:
MD5:
Code:cd Downloads/ md5 archlinux-2017.03.01-dual.iso MD5 (archlinux-2017.03.01-dual.iso) = 1d25235e7cebe45f93452fbc05a0fb66
SHA1:
Code:cd Downloads/ shasum archlinux-2017.03.01-dual.iso f426866ca632a35a3eeae8e4080cff25ec8da614 archlinux-2017.03.01-dual.iso
Or try the simplest way - No needed ArchLinux - Only MacOS:
1 - Boot Single User (press Command + S) at boot (If you have MacOS installed on your hard drive).
2 - If you have a blank HD, then use the USB stick/Pendrive with the MacOS installer (El Capitan, Sierra or HighSierra).
2.1 - Press Option key at boot, Position the mouse on the MacOS installer icon.
2.2 - Press Command + S and keep holding these two keys.
2.3 - Click the MacOS installer icon -> continue holding the Command + S keys until you finish the MacOS installer Single User boot .
Enter these commands (change gpu-power-prefs to Intel GPU and boot verbose):
Code:nvram fa4ce28d-b62f-4c99-9cc3-6815686e30f9:gpu-power-prefs=%01%00%00%00 nvram boot-args="-v" reboot
If you've chosen the Arch Linux route, please continue reading:
Then you could either simply burn this ISO to CD/DVD (which later could be either inserted to MBP's SuperDrive or External DVD Drive connected to MBP by two USB cables) or create a bootable USB: use the great detailed instructions from this page, https://wiki.archlinux.org/index.php/USB_flash_installation_media
2) Boot to it: insert this CD/DVD/USB to Macbook Pro, hold Option key while booting, choose "EFI boot" (that is your bootable installation media), press "e" key to edit the GRUB options of the Arch Linux archiso x86_64 UEFI CD menu entry while it is selected at the main screen, add nomodeset to the end of this line and press Enter. If everything is done correctly, you will find yourself at the Linux console!
3) Edit EFI vars: looks like efivarfs filesystem is mounted by default! So you can already cd /sys/firmware/efi/efivars and ls to explore this directory and see if there is a "gpu-power-prefs-..." variable (where ... is UUID of this variable). If there is such a variable, its better to remove it with rm. In my case the efivarfs has been mounted by default with read/write permissions, but if you are getting the "operation not permitted" message while attempting to rm, it means that in your case efivarfs has been mounted as read-only and you need to remount it with read-write permissions and try again (credits to totoe_84 for this valuable addition) :
*) cd /
*) umount /sys/firmware/efi/efivars/
*) mount -t efivarfs rw /sys/firmware/efi/efivars/
*) cd /sys/firmware/efi/efivars/
If your screen is so distorted that it is difficult to see the letters, just start typing the rm gpu-power-pre and then press TAB key for autocompletion. In my case there were not such a EFI variable, only "gpu-active-..." and maybe somehow related "gfx-saved-config-restore-status-..." . Then I looked again at that gpu-switch text file (mentioned above, https://github.com/0xbb/gpu-switch/blob/master/gpu-switch),
and entered THESE COMMANDS:
*) chattr -i "/sys/firmware/efi/efivars/" <----- skip this command
Actually a gpu-switch script had "${sysfs_efi_vars}/${efi_gpu}" but I didnt have a "gpu-power-prefs-..." variable - so, partially by mistake, I didn't add that efi_gpu suffix and entered this incomplete path accidentally
*) printf "\x07\x00\x00\x00\x01\x00\x00\x00" > /sys/firmware/efi/efivars/gpu-power-prefs-fa4ce28d-b62f-4c99-9cc3-6815686e30f9
Did not have a EFI "gpu-power-prefs-" variable so I thought that it will be OK to create a new one with a random UUID - in this case, taken directly from a gpu-switch script
*) chattr +i "/sys/firmware/efi/efivars/gpu-power-prefs-fa4ce28d-b62f-4c99-9cc3-6815686e30f9"
http://www.tecmint.com/chattr-command-examples/ - chattr (Change Attribute) is a command line Linux utility that is used to set/unset certain attributes to a file in Linux system to secure accidental deletion or modification of important files and folders, even though you are logged in as a root user.
...
Syntax of chattr ---> chattr [operator] [flags] [filename]
...
A file is set with ‘i‘ attribute (+i as you see in this command) ---> cannot be modified (immutable). Means no renaming, no symbolic link creation, no execution, no writable, only superuser can unset the attribute.
...
Operator
This chattr command is supposed to lock a file to make it accessible only by "superuser" - and so that, while booting, your EFI will have no chance to screw up your gpu-power-prefs-... variable under any circumstances
- + : Adds the attribute to the existing attribute of the files.
- – : Removes the attribute to the existing attribute of the files.
- = : Keep the existing attributes that the files have.
*) cd /
Could not unmount efivars if you are inside this directory, so change to the root directory
*) umount /sys/firmware/efi/efivars/
Guarantees that your EFI variables are flushed to efivarfs filesystem, please unmount it safely before rebooting)
*) reboot
===> IF YOU DID EVERYTHING CORRECTLY, MOST LIKELY THAT YOUR MACBOOK PRO IS NOW USING INTEGRATED GRAPHICS WHILE BOOTING, AFTER BOOTING, AND IS WORKING GREAT AGAIN !
In the future maybe you could need to re-apply this solution if you would have to reset your PRAM / NVRAM / SMC because of some other problems, so remember this solution somewhere... Funny thing: now you can't switch to Discrete GPU even using gfxCardStatus, it is forever stuck at Integrated
I spent two working days to discover this solution, and really hope that it will work flawlessly for every MBP owner with a broken discrete GPU. Good luck!
=== NEWS ! YOU COULD ALSO FOLLOW THESE GUIDES FOR THE EXTRA IMPROVEMENTS : ===
Follow the MikeyN Guide - page 35 - #875 - to move the AMDRadeonX3000.kext from the /System/Library/Extensions directory and do not freeze Macbook Pro (at 75% progress bar or "IOConsoleUsers: gIOScreenLockState 3" message).
Rename old AMDRadeonX3000.kext and move new AMDRadeonX3000.kext after update - Page 57 - #1425
Shutdown or Restart Macbook Pro - avoid black screen freeze - Update 2 - Page 57 - #1425
Close the Lid - Sleep - Waking - Page 43 #1066 - Page 50 #1243
I did this part of your fix and it opens the screen but as I told you in other posts, my cursor is disappearing about 3 minutes max after it opens and everything stalls and it restarts.
I am now in Bali and went to the MacRepair site in Ubud, MacDewata. One of the people there had this same problem but sold his computer some time ago for spare parts.
I explained the problem, showed them how it opened and how the cursor disappears suddenly whether I have one app like Calendar open or am trying to open iTunes or anything else, everything freezes and then screen goes black after a short wait and restarts.
I asked them if reseating the track pad would work. They said to try a mouse first.
They tried a mouse (which you also suggested) and the same thing happened ...cursor disappears after 3 minutes and freezes and restarts again.
They said reseating the track pad would not work and that the problem must be in the graphics card.
Have you any idea of a solution (any code to enter?) to stop this from happening so that I can actually use the computer. I love the fact that it boots up to the desk top...but the rest is downhill.
If you can come up with a solution to this conundrum, I will be eternally grateful. You seem to be the genius to solve this problem. It is a challenge I hope you might find a solution for....or maybe someone else here as talented as yourself.
Please try and let me know. I love my old mac and hate the newer more expensive but less capable MacProAir I had to buy to replace it with its tiny 256gigs storage. Wish Jobs weren't dead..... they might have made different decisions less based on money and more based on user's needs.
Thanks,
Ed McCready (living in India but maybe moving to Bali soon)
This is what I did.... nothing more....would love a line of code or two to fix the disappearing cursor / freeze / restart problem...... HELP!
Or try the simplest way - No needed ArchLinux - Only MacOS:
1 - Boot Single User (press Command + S) at boot (If you have MacOS installed on your hard drive).
2 - If you have a blank HD, then use the USB stick/Pendrive with the MacOS installer (El Capitan, Sierra or HighSierra).
2.1 - Press Option key at boot, Position the mouse on the MacOS installer icon.
2.2 - Press Command + S and keep holding these two keys.
2.3 - Click the MacOS installer icon -> continue holding the Command + S keys until you finish the MacOS installer Single User boot .
Enter these commands (change gpu-power-prefs to Intel GPU and boot verbose):
Code:
nvram fa4ce28d-b62f-4c99-9cc3-6815686e30f9:gpu-power-prefs=%01%00%00%00

nvram boot-args="-v"

rebootHi I try to connect eGPU to MacBook Pro (17-inch, Late 2011) with forced iGPU. But when I start up ma mac i got kernel panic
Maybe some one have same experience and could help me with advise.
specs:
MacBook Pro (17-inch, Late 2011)
Mac OS 10.13.6 (17G7024)
Nvidia web driver 387.10.10.10.40.128
EVGA Geforce GTX 1060 ( with PCIe ExpressCard slot)
Anonymous UUID: F84E8644-434F-3B6C-F87A-6C519A3CF6A1
Mon Jul 8 10:44:58 2019
*** Panic Report ***
panic(cpu 2 caller 0xffffff7f8eb4c5cb): NVRM[0/5:0:0]: Read Error 0x0010a100: CFG 0xffffffff 0xffffffff 0xffffffff, BAR0 0xb5000000 0xffffff91fd177000 0x136000a1, D0, P0/0
Backtrace (CPU 2), Frame : Return Address
0xffffff91f83031e0 : 0xffffff800b26bf96
0xffffff91f8303230 : 0xffffff800b395354
0xffffff91f8303270 : 0xffffff800b3875e4
0xffffff91f83032e0 : 0xffffff800b21dfb0
0xffffff91f8303300 : 0xffffff800b26ba0c
0xffffff91f8303430 : 0xffffff800b26b7cc
0xffffff91f8303490 : 0xffffff7f8eb4c5cb
0xffffff91f8303510 : 0xffffff7f8ec3e204
0xffffff91f8303570 : 0xffffff7f8f2ceacd
0xffffff91f83035b0 : 0xffffff7f8f2d07dd
0xffffff91f83035f0 : 0xffffff7f8f2d0f2a
0xffffff91f83036a0 : 0xffffff7f8eba60f1
0xffffff91f83037a0 : 0xffffff7f8eb8cabe
0xffffff91f8303920 : 0xffffff7f8eb4f300
0xffffff91f83039e0 : 0xffffff7f8eb4f50c
0xffffff91f8303a80 : 0xffffff7f8eaeed18
0xffffff91f8303b00 : 0xffffff7f8eaee4e9
0xffffff91f8303b60 : 0xffffff7f8eaf0412
0xffffff91f8303ba0 : 0xffffff7f8c4f9855
0xffffff91f8303c20 : 0xffffff7f8c4f1102
0xffffff91f8303c70 : 0xffffff7f8eaf1491
0xffffff91f8303cc0 : 0xffffff800b86cbff
0xffffff91f8303d10 : 0xffffff800b8c9587
0xffffff91f8303d70 : 0xffffff800b3423b2
0xffffff91f8303dc0 : 0xffffff800b2714a0
0xffffff91f8303e10 : 0xffffff800b24e80d
0xffffff91f8303e60 : 0xffffff800b26131b
0xffffff91f8303ef0 : 0xffffff800b37145d
0xffffff91f8303fa0 : 0xffffff800b21e7b6
Kernel Extensions in backtrace:
com.apple.iokit.IOGraphicsFamily(519.21)[E5B53C5D-BF6E-3D72-9091-A80DFE5426C9]@0xffffff7f8c4e2000->0xffffff7f8c52afff
dependency: com.apple.iokit.IOPCIFamily(2.9)[A922833C-F80C-38EC-ADD6-BAE7B07452C0]@0xffffff7f8ba94000
com.nvidia.web.NVDAResmanWeb(10.3.3)[82BDEF7C-F926-3A43-9B14-9A7AA0C68AB2]@0xffffff7f8eaed000->0xffffff7f8f165fff
dependency: com.apple.iokit.IOPCIFamily(2.9)[A922833C-F80C-38EC-ADD6-BAE7B07452C0]@0xffffff7f8ba94000
dependency: com.apple.iokit.IONDRVSupport(519.21)[8E0EE518-0D53-38C0-B308-2C6CD9EC5B7B]@0xffffff7f8c895000
dependency: com.apple.iokit.IOGraphicsFamily(519.21)[E5B53C5D-BF6E-3D72-9091-A80DFE5426C9]@0xffffff7f8c4e2000
dependency: com.apple.AppleGraphicsDeviceControl(3.20.15)[9C1F924B-4DF3-302E-910D-4DDAC89DF308]@0xffffff7f8c86e000
com.nvidia.web.NVDAGP100HalWeb(10.3.3)[76B91C29-8578-33E2-9C91-A6CB7C5E2C56]@0xffffff7f8f166000->0xffffff7f8f30bfff
dependency: com.nvidia.web.NVDAResmanWeb(10.3.3)[82BDEF7C-F926-3A43-9B14-9A7AA0C68AB2]@0xffffff7f8eaed000
dependency: com.apple.iokit.IOPCIFamily(2.9)[A922833C-F80C-38EC-ADD6-BAE7B07452C0]@0xffffff7f8ba94000
BSD process name corresponding to current thread: WindowServer
Boot args: -v
Mac OS version:
17G7024
Kernel version:
Darwin Kernel Version 17.7.0: Wed Apr 24 21:17:24 PDT 2019; root:xnu-4570.71.45~1/RELEASE_X86_64
Kernel UUID: A2B2C3B5-C3BF-3BD6-97E2-BD8CAFF51AEB
Kernel slide: 0x000000000b000000
Kernel text base: 0xffffff800b200000
__HIB text base: 0xffffff800b100000
System model name: MacBookPro8,3 (Mac-942459F5819B171B)
System uptime in nanoseconds: 18300114912
last loaded kext at 16696233630: com.apple.filesystems.autofs 3.0 (addr 0xffffff7f8e48f000, size 45056)
loaded kexts:
com.nvidia.CUDA 1.1.0
com.nvidia.web.GeForceWeb 10.3.3
com.nvidia.web.NVDAGP100HalWeb 10.3.3
com.nvidia.web.NVDAResmanWeb 10.3.3
com.nvidia.NVDAStartupWeb 10.3.3
com.globaldelight.driver.Boom2Device 1.1
tv.airbeam.driver.AirBeamTV 0.4.0
at.obdev.nke.LittleSnitch 5094
com.apple.filesystems.autofs 3.0
com.apple.driver.AppleHWSensor 1.9.5d0
com.apple.nvidia.NVDAStartup 10.3.2
com.apple.driver.AppleTyMCEDriver 1.0.3d2
com.apple.driver.AGPM 110.23.37
com.apple.driver.AppleMikeyHIDDriver 131
com.apple.driver.ApplePolicyControl 3.20.15
com.apple.driver.AppleMikeyDriver 281.52
com.apple.driver.AudioAUUC 1.70
com.apple.driver.AppleGraphicsDevicePolicy 3.20.15
com.apple.AGDCPluginDisplayMetrics 3.20.0
com.apple.driver.AppleHV 1
com.apple.driver.AppleUpstreamUserClient 3.6.5
com.apple.iokit.IOUserEthernet 1.0.1
com.apple.driver.AppleHDAHardwareConfigDriver 281.52
com.apple.kext.AMDLegacyFramebuffer 1.6.8
com.apple.iokit.IOBluetoothSerialManager 6.0.7f13
com.apple.driver.AppleHDA 281.52
com.apple.driver.pmtelemetry 1
com.apple.driver.AppleIntelHD3000Graphics 10.0.4
com.apple.Dont_Steal_Mac_OS_X 7.0.0
com.apple.driver.ACPI_SMC_PlatformPlugin 1.0.0
com.apple.driver.eficheck 1
com.apple.kext.AMD6000Controller 1.6.8
com.apple.driver.AppleOSXWatchdog 1
com.apple.driver.AppleThunderboltIP 3.1.1
com.apple.driver.AGDCBacklightControl 3.20.0
com.apple.driver.AppleIntelSNBGraphicsFB 10.0.4
com.apple.driver.AppleSMCPDRC 1.0.0
com.apple.driver.AppleMuxControl 3.20.15
com.apple.driver.SMCMotionSensor 3.0.4d1
com.apple.driver.AppleIntelSlowAdaptiveClocking 4.0.0
com.apple.driver.AppleLPC 3.1
com.apple.driver.AppleSMCLMU 211
com.apple.driver.AppleFIVRDriver 4.1.0
com.apple.driver.AppleBacklight 170.12.6
com.apple.driver.AppleMCCSControl 1.5.5
com.apple.iokit.IOBluetoothUSBDFU 6.0.7f13
com.apple.driver.AppleUSBTCKeyEventDriver 254
com.apple.driver.AppleUSBTCButtons 254
com.apple.driver.AppleUSBTCKeyboard 254
com.apple.driver.AppleIRController 353
com.apple.driver.AppleFileSystemDriver 3.0.1
com.apple.filesystems.hfs.kext 407.50.6
com.apple.AppleFSCompression.AppleFSCompressionTypeDataless 1.0.0d1
com.apple.BootCache 40
com.apple.AppleFSCompression.AppleFSCompressionTypeZlib 1.0.0
com.apple.AppleSystemPolicy 1.0
com.apple.filesystems.apfs 748.51.0
com.apple.driver.AirPort.Brcm4331 800.21.30
com.apple.driver.AirPort.Brcm4360 1250.20.1a4
com.apple.driver.AppleFWOHCI 5.5.9
com.apple.iokit.AppleBCM5701Ethernet 10.3.1
com.apple.driver.AppleAHCIPort 329.50.2
com.apple.driver.AppleSmartBatteryManager 161.0.0
com.apple.driver.AppleACPIButtons 6.1
com.apple.driver.AppleRTC 2.0
com.apple.driver.AppleHPET 1.8
com.apple.driver.AppleSMBIOS 2.1
com.apple.driver.AppleACPIEC 6.1
com.apple.driver.AppleAPIC 1.7
com.apple.driver.AppleIntelCPUPowerManagementClient 220.50.1
com.apple.nke.applicationfirewall 185
com.apple.security.TMSafetyNet 8
com.apple.security.quarantine 3
com.apple.driver.AppleIntelCPUPowerManagement 220.50.1
com.apple.kext.triggers 1.0
com.apple.iokit.IOAcceleratorFamily2 378.28
com.apple.iokit.IOAVBFamily 683.1
com.apple.plugin.IOgPTPPlugin 680.15
com.apple.driver.AppleSSE 1.0
com.apple.iokit.IOSurface 211.16
com.apple.iokit.IOSerialFamily 11
com.apple.driver.DspFuncLib 281.52
com.apple.kext.OSvKernDSPLib 526
com.apple.driver.IOPlatformPluginLegacy 1.0.0
com.apple.kext.AMDSupport 1.6.8
com.apple.driver.AppleHDAController 281.52
com.apple.iokit.IOHDAFamily 281.52
com.apple.iokit.IOAudioFamily 206.5
com.apple.vecLib.kext 1.2.0
com.apple.driver.AppleSMBusPCI 1.0.14d1
com.apple.driver.AppleGraphicsControl 3.20.15
com.apple.AppleGPUWrangler 3.20.0
com.apple.AppleGraphicsDeviceControl 3.20.15
com.apple.iokit.IOSlowAdaptiveClockingFamily 1.0.0
com.apple.driver.IOPlatformPluginFamily 6.0.0d8
com.apple.iokit.IOFireWireIP 2.2.9
com.apple.kext.AMDLegacySupport 1.6.8
com.apple.driver.AppleThunderboltEDMSink 4.1.4
com.apple.driver.AppleThunderboltDPOutAdapter 5.5.5
com.apple.driver.AppleBacklightExpert 1.1.0
com.apple.iokit.IONDRVSupport 519.21
com.apple.driver.AppleSMBusController 1.0.18d1
com.apple.iokit.IOGraphicsFamily 519.21
com.apple.iokit.BroadcomBluetoothHostControllerUSBTransport 6.0.7f13
com.apple.iokit.IOBluetoothHostControllerUSBTransport 6.0.7f13
com.apple.iokit.IOBluetoothHostControllerTransport 6.0.7f13
com.apple.iokit.IOBluetoothFamily 6.0.7f13
com.apple.driver.AppleUSBMultitouch 262
com.apple.driver.usb.IOUSBHostHIDDevice 1.2
com.apple.driver.usb.cdc 5.0.0
com.apple.driver.usb.networking 5.0.0
com.apple.driver.usb.AppleUSBHostCompositeDevice 1.2
com.apple.driver.usb.AppleUSBHub 1.2
com.apple.filesystems.hfs.encodings.kext 1
com.apple.driver.AppleThunderboltDPInAdapter 5.5.5
com.apple.driver.AppleThunderboltDPAdapterFamily 5.5.5
com.apple.driver.AppleThunderboltPCIDownAdapter 2.1.3
com.apple.driver.AppleXsanScheme 3
com.apple.iokit.IOAHCIBlockStorage 301.40.2
com.apple.driver.AppleThunderboltNHI 4.7.3
com.apple.iokit.IOThunderboltFamily 6.7.9
com.apple.iokit.IO80211Family 1200.12.2
com.apple.driver.corecapture 1.0.4
com.apple.iokit.IOFireWireFamily 4.7.2
com.apple.iokit.IOEthernetAVBController 1.1.0
com.apple.driver.mDNSOffloadUserClient 1.0.1b8
com.apple.driver.AppleUSBMergeNub 900.4.1
com.apple.iokit.IOAHCIFamily 288
com.apple.driver.usb.AppleUSBUHCIPCI 1.2
com.apple.driver.usb.AppleUSBUHCI 1.2
com.apple.driver.usb.AppleUSBEHCIPCI 1.2
com.apple.driver.usb.AppleUSBEHCI 1.2
com.apple.driver.usb.AppleUSBHostPacketFilter 1.0
com.apple.iokit.IOUSBFamily 900.4.1
com.apple.driver.AppleUSBHostMergeProperties 1.2
com.apple.driver.AppleEFINVRAM 2.1
com.apple.driver.AppleEFIRuntime 2.1
com.apple.iokit.IOSMBusFamily 1.1
com.apple.iokit.IOHIDFamily 2.0.0
com.apple.security.sandbox 300.0
com.apple.kext.AppleMatch 1.0.0d1
com.apple.driver.DiskImages 480.60.3
com.apple.driver.AppleFDEKeyStore 28.30
com.apple.driver.AppleEffaceableStorage 1.0
com.apple.driver.AppleKeyStore 2
com.apple.driver.AppleUSBTDM 439.70.3
com.apple.driver.AppleMobileFileIntegrity 1.0.5
com.apple.iokit.IOUSBMassStorageDriver 140.70.2
com.apple.iokit.IOSCSIBlockCommandsDevice 404.30.3
com.apple.iokit.IOSCSIArchitectureModelFamily 404.30.3
com.apple.iokit.IOStorageFamily 2.1
com.apple.driver.AppleCredentialManager 1.0
com.apple.driver.KernelRelayHost 1
com.apple.iokit.IOUSBHostFamily 1.2
com.apple.driver.usb.AppleUSBCommon 1.0
com.apple.driver.AppleBusPowerController 1.0
com.apple.driver.AppleSEPManager 1.0.1
com.apple.driver.IOSlaveProcessor 1
com.apple.iokit.IOReportFamily 31
com.apple.iokit.IOTimeSyncFamily 680.15
com.apple.iokit.IONetworkingFamily 3.4
com.apple.driver.AppleACPIPlatform 6.1
com.apple.driver.AppleSMC 3.1.9
com.apple.iokit.IOPCIFamily 2.9
com.apple.iokit.IOACPIFamily 1.4
com.apple.kec.pthread 1
com.apple.kec.corecrypto 1.0
com.apple.kec.Libm 1
EOF
Model: MacBookPro8,3, BootROM 85.0.0.0.0, 4 processors, Intel Core i7, 2,4 GHz, 16 GB, SMC 1.70f5
Graphics: Intel HD Graphics 3000, Intel HD Graphics 3000, Built-In
Graphics: AMD Radeon HD 6770M, AMD Radeon HD 6770M, PCIe
Memory Module: BANK 0/DIMM0, 8 GB, DDR3, 1600 MHz, 0x0198, 0x393930353432382D3039352E4430304C4620
Memory Module: BANK 1/DIMM0, 8 GB, DDR3, 1600 MHz, 0x0198, 0x393930353432382D3039352E4430304C4620
AirPort: spairport_wireless_card_type_airport_extreme (0x14E4, 0xD6), Broadcom BCM43xx 1.0 (5.106.98.102.30)
Bluetooth: Version 6.0.7f13, 3 services, 27 devices, 1 incoming serial ports
Network Service: Wi-Fi, AirPort, en1
Serial ATA Device: Samsung SSD 860 EVO 500GB, 500,11 GB
Serial ATA Device: TOSHIBA MK7559GSXF, 750,16 GB
USB Device: USB 2.0 Bus
USB Device: FaceTime HD Camera (Built-in)
USB Device: Hub
USB Device: BRCM2070 Hub
USB Device: Bluetooth USB Host Controller
USB Device: Apple Internal Keyboard / Trackpad
USB Device: USB 2.0 Bus
USB Device: Hub
USB Device: IR Receiver
Thunderbolt Bus: MacBook Pro, Apple Inc., 25.1
specs:
MacBook Pro (17-inch, Late 2011)
Mac OS 10.13.6 (17G7024)
Nvidia web driver 387.10.10.10.40.128
EVGA Geforce GTX 1060 ( with PCIe ExpressCard slot)
You are absolutely genius! I used the "simplest way" (no needed archlinux)(in red letters below) because when I booted holding the option key, no "EFI" showed up, only my hard drive. Following your "simplest way", I just booted holding down command + S then entered the commands/code you gave and voila!!! Literally took 2 minutes. Can't thank you enough. I paid $3400 for this mac, had upgraded the RAM/HD memory and was in very good shape.
Or try the simplest way - No needed ArchLinux - Only MacOS:
1 - Boot Single User (press Command + S) at boot (If you have MacOS installed on your hard drive).
2 - If you have a blank HD, then use the USB stick/Pendrive with the MacOS installer (El Capitan, Sierra or HighSierra).
2.1 - Press Option key at boot, Position the mouse on the MacOS installer icon.
2.2 - Press Command + S and keep holding these two keys.
2.3 - Click the MacOS installer icon -> continue holding the Command + S keys until you finish the MacOS installer Single User boot .
Enter these commands (change gpu-power-prefs to Intel GPU and boot verbose):
nvram fa4ce28d-b62f-4c99-9cc3-6815686e30f9:gpu-power-prefs=%01%00%00%00

nvram boot-args="-v"

reboot
===> IF YOU DID EVERYTHING CORRECTLY, MOST LIKELY THAT YOUR MACBOOK PRO IS NOW USING INTEGRATED GRAPHICS WHILE BOOTING, AFTER BOOTING, AND IS WORKING GREAT AGAIN !")
In the future maybe you could need to re-apply this solution if you would have to reset your PRAM / NVRAM / SMC because of some other problems, so remember this solution somewhere... Funny thing: now you can't switch to Discrete GPU even using gfxCardStatus, it is forever stuck at Integrated
I spent two working days to discover this solution, and really hope that it will work flawlessly for every MBP owner with a broken discrete GPU. Good luck!
=== NEWS ! YOU COULD ALSO FOLLOW THESE GUIDES FOR THE EXTRA IMPROVEMENTS : ===
Follow the MikeyN Guide - page 35 - #875 - to move the AMDRadeonX3000.kext from the /System/Library/Extensions directory and do not freeze Macbook Pro (at 75% progress bar or "IOConsoleUsers: gIOScreenLockState 3" message).
Rename old AMDRadeonX3000.kext and move new AMDRadeonX3000.kext after update - Page 57 - #1425
Shutdown or Restart Macbook Pro - avoid black screen freeze - Update 2 - Page 57 - #1425
Close the Lid - Sleep - Waking - Page 43 #1066 - Page 50 #1243[/QUOTE][/code]
Or try the simplest way - No needed ArchLinux - Only MacOS:
1 - Boot Single User (press Command + S) at boot (If you have MacOS installed on your hard drive).
2 - If you have a blank HD, then use the USB stick/Pendrive with the MacOS installer (El Capitan, Sierra or HighSierra).
2.1 - Press Option key at boot, Position the mouse on the MacOS installer icon.
2.2 - Press Command + S and keep holding these two keys.
2.3 - Click the MacOS installer icon -> continue holding the Command + S keys until you finish the MacOS installer Single User boot .
Enter these commands (change gpu-power-prefs to Intel GPU and boot verbose):
nvram fa4ce28d-b62f-4c99-9cc3-6815686e30f9:gpu-power-prefs=%01%00%00%00
nvram boot-args="-v"
reboot
===> IF YOU DID EVERYTHING CORRECTLY, MOST LIKELY THAT YOUR MACBOOK PRO IS NOW USING INTEGRATED GRAPHICS WHILE BOOTING, AFTER BOOTING, AND IS WORKING GREAT AGAIN !
In the future maybe you could need to re-apply this solution if you would have to reset your PRAM / NVRAM / SMC because of some other problems, so remember this solution somewhere... Funny thing: now you can't switch to Discrete GPU even using gfxCardStatus, it is forever stuck at Integrated
I spent two working days to discover this solution, and really hope that it will work flawlessly for every MBP owner with a broken discrete GPU. Good luck!
=== NEWS ! YOU COULD ALSO FOLLOW THESE GUIDES FOR THE EXTRA IMPROVEMENTS : ===
Follow the MikeyN Guide - page 35 - #875 - to move the AMDRadeonX3000.kext from the /System/Library/Extensions directory and do not freeze Macbook Pro (at 75% progress bar or "IOConsoleUsers: gIOScreenLockState 3" message).
Rename old AMDRadeonX3000.kext and move new AMDRadeonX3000.kext after update - Page 57 - #1425
Shutdown or Restart Macbook Pro - avoid black screen freeze - Update 2 - Page 57 - #1425
Close the Lid - Sleep - Waking - Page 43 #1066 - Page 50 #1243[/QUOTE][/code]
Download MacOS Sierra 10.12.1 Update (1.36 GB). And make a second copy of this Update.
Do not do any installation.
After I explain. Still doing tests but very promising. I do not know if Apple will remove this MacOS Sierra 10.12.1 Update from Apple's website.
Yes, if you have Sierra (10.12) and / or High Sierra (10.13), download MacOS Sierra 10.12.1 Update because it works for both systems above.
Download macOS Sierra 10.12.1 Update - Post Date: Oct 27, 2016
https://support.apple.com/kb/DL1897?viewlocale=en_US&locale=en_US
Would you care to elaborate further?
Hello all. My 2011 MBP was dead as described in this thread (gray screen after reboot). Ran the 3 commands above and now it works!! Wow. Though the fan came on big time after I logged in. Fortunately stopped after a few minutes.
Hoping it will get me through to next year when maybe Apple has a MBP I actually want to buy.
Hoping it will get me through to next year when maybe Apple has a MBP I actually want to buy.
Use the TAB key to auto complete filenames and directories.
Start by typing a directory name or file and press the TAB key to auto complete. Name directories and files that have already been created.
- Macbook Pro 15" Early 2011 with failed AMD GPU. Only Intel GPU work.
- High Sierra 10.13.6.
- gfxcardstatus 2.4.3i (fork Steve Schow) -> preferences -> load gfxCardStatus at Startup and Dynamic Switching selected.
This is a test you can do if you are having problems with black screen after Macbook Pro sleep or macOS trying to switch to the failed AMD GPU.
The focus of the problem is AppleMuxControl.kext and AMDRadeonX3000.kext.
AppleMuxControl.kext is the kext responsible for changing GPUs while using macOS.
AMDRadeonX3000.kext needs to be loaded so that the IOAcceleratorFamily2.kext can power off the failed AMD GPU.
I'm testing the AppleMuxControl (version 3.13) of Sierra 10.12.1 with no problems so far (6 days).
High Sierra 10.13.6 with AppleMuxControl.kext (3.13) from Sierra 10.12.1.
High Sierra 10.13.6 Frankenstein.
Sierra 10.12.1 -> AppleMuxControl.kext (version 3.13)
High Sierra 10.13.6 -> AppleMuxControl.kext (version 3.20)
The correct location for AppleMuxControl.kext is:
/System/Library/Extensions/AppleGraphicsControl.kext/Contents/PlugIns/AppleMuxControl.kext
I did not test with other Sierra AppleMuxControl.kext (10.12.2, 10.12.3, 10.12.4, 10.12.5 and 10.12.6).
There is a big difference in AppleMuxControl.kext from Sierra 10.12.0 and 10.12.1. In these two AppleMuxControl.kext there is no message: "AGC: booted to IG, policy disabled!!".
IG = Integrated Graphics = Intel GPU
After the discovery of how to make the Intel GPU boot Macbook Pro 2011 by gpu-power-prefs, then Apple changed the AppleMuxControl.kext.
Apple is not content to be a billion dollar company decides to make life difficult for the Macbook Pro 2011 users only to force a new purchase Macbook.
1 - Download Sierra 10.12.1 update from Apple:
https://support.apple.com/kb/DL1897?viewlocale=en_US&locale=en_US
2 - Double click on macosupd10.12.1.dmg .
3 - After mount .DMG file, extract /System/Library/Extensions (macOSUpd10.12.1.pkg) with Pacifist to another directory. See pictures bellow.
This example -> extract kexts -> directory: /Users/Shared/Kext-Sierra-10.12.1
Pacifist 3.6.1
https://www.charlessoft.com
4 - The Pacifist will ask if you want to keep kext's administrative privileges. Answer YES and enter your user name and password.
5 - To ensure that everything is correct, use the commands below to configure AppleMuxControl.kext with user: root and group: wheel and execution privilege.
6 - Reboot Macbook Pro 2011.
7 - Boot Recovery Mode (press Command + R keys at boot).
8 - Menu Utilities -> Terminal
9 - Boot Single User Mode (press Command + S keys at boot).
10 - Verify filesystem
11 - Mount system partition with Read and Write permissions. Do not forget the final Slash "/".
12 - Create a backup directory for AppleMuxControl.kext (3.20) - High Sierra 10.13.6.
13 - Move AppleMuxControl.kext (3.20) inside /System/Library/Extensions/AppleGraphicsControl.kext/Contents/Plugins to Kext-HighSierra directory.
14 - Copy AppleMuxControl.kext (3.13 - Sierra 10.12.1) to /System/Library/Extensions/AppleGraphicsControl.kext/Contents/PlugIns/
15 - Modify timestamp and create new kextcache. Do not forget the final Slash "/" kextcache command.
16 - Boot normal with High Sierra 10.13.6.
17 - Verify AppleMuxControl.kext (version 3.13.74) with kextstat command.
18 - System Preferences -> Display -> see if brightness slider works
19 - Everything works? YES
20 - Boot Recovery Mode
21 - Menu Utilities -> Terminal
Enable SIP again.
or
Enable SIP partially without the verification of kext signed by Apple.
22 - Boot normal and verify SIP status.
Finder -> Applications -> Utilities -> Terminal
or
Update 1:
With a new Update, the procedure must be repeated.
Update will put a new AppleMuxControl.kext.
Update will put a new AMDRadeonX3000.kext. MikeyN Guide deacrese AMD GPU - System temperature - Page 35 - #875
gfxCardStatus 2.4.3i - fork Steve Schow
https://github.com/steveschow/gfxCardStatus
https://github.com/steveschow/gfxCardStatus/releases
https://github.com/steveschow/gfxCardStatus/releases/tag/v2.4.3i
Start by typing a directory name or file and press the TAB key to auto complete. Name directories and files that have already been created.
- Macbook Pro 15" Early 2011 with failed AMD GPU. Only Intel GPU work.
- High Sierra 10.13.6.
- gfxcardstatus 2.4.3i (fork Steve Schow) -> preferences -> load gfxCardStatus at Startup and Dynamic Switching selected.
This is a test you can do if you are having problems with black screen after Macbook Pro sleep or macOS trying to switch to the failed AMD GPU.
The focus of the problem is AppleMuxControl.kext and AMDRadeonX3000.kext.
AppleMuxControl.kext is the kext responsible for changing GPUs while using macOS.
AMDRadeonX3000.kext needs to be loaded so that the IOAcceleratorFamily2.kext can power off the failed AMD GPU.
I'm testing the AppleMuxControl (version 3.13) of Sierra 10.12.1 with no problems so far (6 days).
High Sierra 10.13.6 with AppleMuxControl.kext (3.13) from Sierra 10.12.1.
High Sierra 10.13.6 Frankenstein.
Sierra 10.12.1 -> AppleMuxControl.kext (version 3.13)
High Sierra 10.13.6 -> AppleMuxControl.kext (version 3.20)
The correct location for AppleMuxControl.kext is:
/System/Library/Extensions/AppleGraphicsControl.kext/Contents/PlugIns/AppleMuxControl.kext
I did not test with other Sierra AppleMuxControl.kext (10.12.2, 10.12.3, 10.12.4, 10.12.5 and 10.12.6).
There is a big difference in AppleMuxControl.kext from Sierra 10.12.0 and 10.12.1. In these two AppleMuxControl.kext there is no message: "AGC: booted to IG, policy disabled!!".
IG = Integrated Graphics = Intel GPU
After the discovery of how to make the Intel GPU boot Macbook Pro 2011 by gpu-power-prefs, then Apple changed the AppleMuxControl.kext.
Apple is not content to be a billion dollar company decides to make life difficult for the Macbook Pro 2011 users only to force a new purchase Macbook.
1 - Download Sierra 10.12.1 update from Apple:
https://support.apple.com/kb/DL1897?viewlocale=en_US&locale=en_US
2 - Double click on macosupd10.12.1.dmg .
3 - After mount .DMG file, extract /System/Library/Extensions (macOSUpd10.12.1.pkg) with Pacifist to another directory. See pictures bellow.
This example -> extract kexts -> directory: /Users/Shared/Kext-Sierra-10.12.1
Pacifist 3.6.1
https://www.charlessoft.com
4 - The Pacifist will ask if you want to keep kext's administrative privileges. Answer YES and enter your user name and password.
5 - To ensure that everything is correct, use the commands below to configure AppleMuxControl.kext with user: root and group: wheel and execution privilege.
Code:
sudo chmod -Rv 755 /Users/Shared/Kext-Sierra-10.12.1/Extensions/AppleGraphicsControl.kext
Code:
sudo chown -Rv root:wheel /Users/Shared/Kext-Sierra-10.12.1/Extensions/AppleGraphicsControl.kext6 - Reboot Macbook Pro 2011.
7 - Boot Recovery Mode (press Command + R keys at boot).
8 - Menu Utilities -> Terminal
Code:
csrutil disable9 - Boot Single User Mode (press Command + S keys at boot).
10 - Verify filesystem
Code:
fsck -fy11 - Mount system partition with Read and Write permissions. Do not forget the final Slash "/".
Code:
mount -uw /12 - Create a backup directory for AppleMuxControl.kext (3.20) - High Sierra 10.13.6.
Code:
cd /
sudo mkdir -v Kext-HighSierra
13 - Move AppleMuxControl.kext (3.20) inside /System/Library/Extensions/AppleGraphicsControl.kext/Contents/Plugins to Kext-HighSierra directory.
Code:
sudo mv -v /System/Library/Extensions/AppleGraphicsControl.kext/Contents/PlugIns/AppleMuxControl.kext /Kext-HighSierra14 - Copy AppleMuxControl.kext (3.13 - Sierra 10.12.1) to /System/Library/Extensions/AppleGraphicsControl.kext/Contents/PlugIns/
Code:
sudo cp -vR /Users/Shared/Kext-Sierra-10.12.1/Extensions/AppleGraphicsControl.kext/Contents/PlugIns/AppleMuxControl.kext /System/Library/Extensions/AppleGraphicsControl.kext/Contents/PlugIns/15 - Modify timestamp and create new kextcache. Do not forget the final Slash "/" kextcache command.
Code:
sudo touch /System/Library/Extensions

sudo kextcache -v 1 -i /
16 - Boot normal with High Sierra 10.13.6.
17 - Verify AppleMuxControl.kext (version 3.13.74) with kextstat command.
Code:
kextstat | grep -i Mux
com.apple.driver.AppleMuxControl (3.13.74)
18 - System Preferences -> Display -> see if brightness slider works
19 - Everything works? YES
20 - Boot Recovery Mode
21 - Menu Utilities -> Terminal
Enable SIP again.
Code:
csrutil enable
reboot
or
Enable SIP partially without the verification of kext signed by Apple.
Code:
csrutil enable --without kext
reboot
22 - Boot normal and verify SIP status.
Finder -> Applications -> Utilities -> Terminal
Code:
csrutil status
System Integrity Protection status: enabled
or
Code:
csrutil status
System Integrity Protection status: enabled (Custom Configuration).

Configuration:
Apple Internal: disabled
Kext Signing: disabled
Filesystem Protections: enabled
Debugging Restrictions: enabled
DTrace Restrictions: enabled
NVRAM Protections: enabled
BaseSystem Verification: enabled
Update 1:
With a new Update, the procedure must be repeated.
Update will put a new AppleMuxControl.kext.
Update will put a new AMDRadeonX3000.kext. MikeyN Guide deacrese AMD GPU - System temperature - Page 35 - #875
gfxCardStatus 2.4.3i - fork Steve Schow
https://github.com/steveschow/gfxCardStatus
https://github.com/steveschow/gfxCardStatus/releases
https://github.com/steveschow/gfxCardStatus/releases/tag/v2.4.3i
Attachments
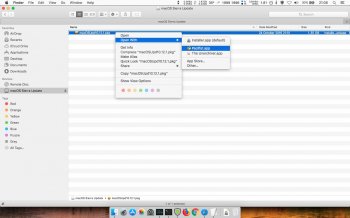
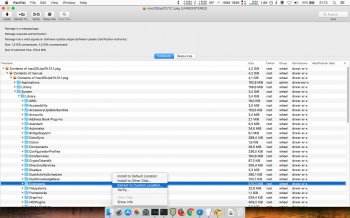
Last edited:
This is exactly the issue I have, great there is a solution!
I have booted with CMD + S and followed the 9 steps as described just below. Unfortunately, I get stuck at step 5. When that command tries to remove the AMD drivers cache, I get 14 subdirectories listed with the error message "Operation not permitted". So I cannot continue with steps 6 till 9.
What Can I do about this?
================================================
If you don't have time to read my story (which also describes some interesting technical approaches) just scroll down this thread until a "100% WORKING SOLUTION" text
Discrete AMD GPU of my 2011 MacBook Pro 8,2 has finally failed because of the reasons mentioned here ( http://logicboardmac.blogspot.ru/ ) and there ( https://www.macrumors.com/2015/02/19/2011-macbook-pro-repair-program-apple/ ) . It has been working perfectly for 6 years under quite a high load, even tried SETI@HOME mining at background! So I was confident that my MBP is not affected by bad solder / bad soldering quality and didn't want to bring it to Apple for a free repair program - partially because couldn't find the time to pause my important software projects, partially because I was afraid that Apple might give me a less reliable logic board or refuse a free repair because of the several unrelated repairs that I did manually by myself earlier to save money: changed thermal paste a few times, replaced the internal battery 2 times, replaced a keyboard with broken buttons, etc. But it finally broke down last week: laptop's screen image became distorted, it refused to boot OS X (always freezing half-way), and - Apple free repair program has already ended! I know there are affordable solutions like $50 BGA resoldering at unofficial local repair shop and that its possible to get a new replacement HD 6750M chip from AliExpress for $35 or cheaper ( http://www.aliexpress.com/item/DC-2...0028-216-0810028-BGA-Chipset/32764872143.html or https://www.aliexpress.com/item/DC-2015-New-216-0810001-216-0810001-Graphic-Chipset/32718112928.html , because don't know if this is true - https://www.rossmanngroup.com/board...0604-replace-216-0810005-gpu-with-216-0810028 ) to guarantee a successful repair, so the total price of repair would be either $50 or $50+$35=$85 - less than $100 in any case. But I don't like investing money to the old computers, so I have thought - what if there is some hack to force MBP to use integrated graphics ALL THE TIME, even while booting ? And then started to explore the possible solutions...
===
First of all, it is possible to successfully boot a MBP to OS X while still using the failed GPU, after you remove the AMD drivers by booting in command line mode (CMD+S) and entering these commands:
1) fsck -fy (to check a disk)
2) mount -uw / (mount a root filesystem with read/write permissions)
3) sudo mkdir /AMD_Kexts/ (make a directory to store the AMD drivers in case you'll need them in future)
4) sudo mv /System/Library/Extensions/AMD*.* /AMD_Kexts/ (move the AMD drivers)
5) sudo rm -rf /System/Library/Caches/com.apple.kext.caches/ (remove the AMD drivers cache)
6) sudo mkdir /System/Library/Caches/com.apple.kext.caches/ (just in case OS X will be dumb and will not recreate this directory, I am creating it for OS X)
7) sudo touch /System/Library/Extensions/ (to update the timestamps so that new driver caches - without AMD drivers - will be definitely rebuilt)
8) sudo umount / (umount a partition to guarantee that your changes are flushed to it)
9) sudo reboot
The degree of your inconvenience while doing these steps - strongly depends on how heavily a screen's image is distorted in your case. In my case it was even more difficult because the OS X partition became a "read-only" partition (because of too many emergency shutdowns I did while desperately trying to boot OS X with a failed GPU) so I had to remove a hard drive from MacBook Pro and (using a USB to SATA 2.5" adapter taken from my portable HDD) attached it to a computer with Linux, then followed these instructions:
https://superuser.com/questions/961401/mounting-hfs-partition-on-arch-linux (1st answer) - carefully executed a number of commands, calculated a sizelimit for my parition layout, and finally ran sudo mount -t hfsplus -o force,rw,sizelimit=YOURNUMBER /dev/sdb2 /mnt to mount this HFS+ partition to /mnt directory in read-write mode. Then I performed these "1)-7)" steps you see above, and also repaired a filesystem by running sudo fsck.hfsplus -f /dev/sdb2 before unmounting a partition with sudo umount /mnt and putting a hard drive back to MBP...
===
This gave me a MBP which could boot to OS X although STILL using a broken AMD GPU: so it screen's image is very distorted (could browse the Internet but quite inconvenient to read a text), Launchpad is super laggy, and you can't switch to Integrated GPU using gfxCardStatus because: without AMD drivers (which we had to remove to successfully boot to OS X) Macbook Pro thinks its' internal screen is External Display and gfxCardStatus tells it is impossible to switch because External Display is using AMD GPU. Somewhere I found a suggestion that it is possible to rebuild a gfxCardStatus from the source code - https://github.com/codykrieger/gfxCardStatus - with removed or commented out 156-166 lines in the ./gfxCardStatus/Classes/GSProcess.m to make it to ignore the external display:
// find out if an external monitor is forcing the discrete gpu on
CGDirectDisplayID displays[8];
CGDisplayCount displayCount = 0;
if (CGGetOnlineDisplayList(8, displays, &displayCount) == noErr) {
for (int i = 0; i < displayCount; i++) {
if ( ! CGDisplayIsBuiltin(displays))
[list addObject:[NSDictionary dictionaryWithObjectsAndKeys:
Str(@"External Display"), kTaskItemName,
@"", kTaskItemPID, nil]];
}
}
So I rebuilt a gfxCardStatus using the instructions from the last reply of this issue -
https://github.com/codykrieger/gfxCardStatus/issues/229
(also had to download a MacOSX10.11.sdk from here - https://github.com/phracker/MacOSX-SDKs/releases - unpack and copy it to XCode's /Applications/Xcode.app/Contents/Developer/Platforms/MacOSX.platform/Developer/SDKs/MacOSX10.11.sdk - because of the Apple's stupidity the latest XCode for El Capitan does not include SDK for El Capitan!) However, it still didn't work - gfxCardStatus only pretended that it has switched to Integrated GPU, while in reality OS X did not let it switch! Even after I edited ./gfxCardStatus/Classes/GSGPU.m file to enable the mysterious "Nuke it from orbit switching" option, it still couldn't switch...
===
Then I discovered this interesting repository - https://github.com/0xbb/gpu-switch - which is partially similar by its' source code to gfxCardStatus but also has the "Login Hooks" (install_hooks.sh) to "automate the switching process for login/logout". Sadly it didn't work for me... However, there is a very interesting gpu-switch text file right at the root of this repository, which describes the EFI variables!
https://github.com/0xbb/gpu-switch/blob/master/gpu-switch
After studying it and also reading this issue's comments - https://github.com/0xbb/gpu-switch/issues/11 - I became confident to try this solution, but found out that my MacBook Pro 2011 8,2 with OS X El Capitan 10.11.6 is in a VERY problematic situation:
1) rEFInd is not installed, and to install it - must disable SIP protection. But I cannot boot to Recovery mode (Command+Option+R) or to OS X Installation DVD/USB (hold Option), (to disable SIP), because they freeze while booting! - although I removed AMD kexts from my system, of course these recovery tools are using AMD kexts integrated to their design. Also cannot use Rootfool hack ( https://github.com/gdbinit/rootfool ) to disable SIP during runtime, because it works only at OS X version older than 10.11.4
2) Tried overheating my Macbook Pro on purpose (forcing CPU usage to 100% and putting it to a tightly closed bag) to force it to shutdown from overheating and then quickly reboot so that Integrated graphics will be enabled during the boot time - making it possible to boot to Recovery. But because of the wonderful high end thermal paste I have applied not so long ago - cannot overheat it even after waiting for a long time! At this point I thought that could either: a) remove AMD kexts from Installation media, or b) to connect MBP's hard drive to a Linux machine again and run a bunch of chmods to remove the SIP flags from the directories mentioned here ( http://apple.stackexchange.com/questions/193368/what-is-the-rootless-feature-in-el-capitan-really ) which could potentially make a system unbootable, or c) to try installing rEFInd to HFS+ partition directly from a Linux machine with root rights because it will bypass SIP --- but have not explored these options, although some of them might have worked...
3) Wanted to boot a Linux LiveCD to edit the EFI variables from there, but no matter what I did: tried booting straight without GRUB option modifications, tried editing GRUB boot options (with "e" key) to add nomodeset / remove quiet splash / or both in every combination , or like suggested in this article ( https://wiki.archlinux.org/index.php/MacBookPro8,1/8,2/8,3_(2011) ) also add i915.modeset=0 radeon.modeset=0 or radeon.modeset=0 i915.modeset=1 i915.lvds_channel_mode=2 ; and then pressed Fn+F10 or Shift+Ctrl+Fn+F10 to boot with these options: but the Linux boot process always failed at different boot stages, no matter what popular user-friendly Linux distribution or what version of it I am trying: tried many releases of Ubuntu / Lubuntu / Fedora , even the old "AMD64 Mac" and "Alternate AMD64 Mac" images, but they always failed - either at the very beginning of boot process (black screen, or a black screen with a blinking or stuck _ character at the left upper corner) or failed at the very end of it - right before it is supposed to show a graphical desktop environment...
Later, totoe_84 wrote that he was able to boot Ubuntu in graphical mode using the following setup for GRUB:
- To disable the AMD graphics card I added the following lines after set gfxpayload=keep
outb 0x728 1
outb 0x710 2
outb 0x740 2
outb 0x750 0(based on https://ubuntuforums.org/showthread.php?t=2157775 )
- Next I added the following after quiet splash
i915.lvds_channel_mode=2 i915.modeset=1 i915.lvds_use_ssc=0
===
Then I remembered that there are not-mainstream Linux distributions for advanced users, which have a LiveCD without any graphical interface: you are dropped to a pure console and you are supposed to install the system along with only those graphical interfaces and software packages / groups of packages which you explicitly select. For example: Arch Linux (https://www.archlinux.org/) and Gentoo Linux (https://gentoo.org/) . Because their LiveCD does not have a graphical interface, they could be booted without a problem to a pure Linux console and there you could edit the EFI variables ! So here is a...
===
=== 100% WORKING SOLUTION
===
=== Force your MBP to ALWAYS use Intel integrated GPU (EFI variable fix)
===
=== to make it great again !
===
1) Create the Arch Linux LiveCD/LiveUSB :
You need a working computer for that and a spare CD/DVD/USB drive. After downloading archlinux-2017.03.01-dual.iso (see the links below) you have to check the integrity of the .ISO file to see if it is not corrupted (avoid I/O error, printf: not found, chattr: not found, etc). After checking the integrity of archlinux-2017.03.01-dual.iso and everything is OK, then you can generate an ArchLinux boot disk.
archlinux-2017.03.01-dual.iso
MD5:
1d25235e7cebe45f93452fbc05a0fb66 archlinux-2017.03.01-dual.iso
SHA1
f426866ca632a35a3eeae8e4080cff25ec8da614 archlinux-2017.03.01-dual.iso
Official website ArchLinux (only Torrent) - See MD5 and SHA1 hash numbers:
https://www.archlinux.org/releng/releases/2017.03.01/
The MD5 and SHA1 of the official ArchLinux website are the same as the mirrors Virtapi.org and Belnet.be. The archlinux-2017.03.01-dual.iso on Virtapi.org and Belnet.be are legitimate.
Virtapi.org:
http://archive.virtapi.org/iso/2017.03.01/
http://archive.virtapi.org/iso/2017.03.01/archlinux-2017.03.01-dual.iso
http://archive.virtapi.org/iso/2017.03.01/md5sums.txt
http://archive.virtapi.org/iso/2017.03.01/sha1sums.txt
Belnet:
http://ftp.belnet.be/pub/archlinux.org/iso/2017.03.01/
http://ftp.belnet.be/pub/archlinux.org/iso/2017.03.01/archlinux-2017.03.01-dual.iso
http://ftp.belnet.be/pub/archlinux.org/iso/2017.03.01/md5sums.txt
http://ftp.belnet.be/pub/archlinux.org/iso/2017.03.01/sha1sums.txt
Check for archlinux-2017.03.01-dual.iso integrity (Mac OS):
Boot in Safe Mode (press SHIFT key at boot) -> no freeze Mac OS -> El Capitan or Sierra.
HighSierra maybe freeze at boot time (Safe Mode). There were changes in the HighSierra in relation to the AMD kexts loaded during the Safe Mode. More tests are needed.
File downloaded -> /Users/Your_User/Downloads/archlinux-2017.03.01-dual.iso
Finder -> Applications -> Utilities -> Terminal:
MD5:
Code:cd Downloads/ md5 archlinux-2017.03.01-dual.iso MD5 (archlinux-2017.03.01-dual.iso) = 1d25235e7cebe45f93452fbc05a0fb66
SHA1:
Code:cd Downloads/ shasum archlinux-2017.03.01-dual.iso f426866ca632a35a3eeae8e4080cff25ec8da614 archlinux-2017.03.01-dual.iso
Or try the simplest way - No needed ArchLinux - Only MacOS:
1 - Boot Single User (press Command + S) at boot (If you have MacOS installed on your hard drive).
2 - If you have a blank HD, then use the USB stick/Pendrive with the MacOS installer (El Capitan, Sierra or HighSierra).
2.1 - Press Option key at boot, Position the mouse on the MacOS installer icon.
2.2 - Press Command + S and keep holding these two keys.
2.3 - Click the MacOS installer icon -> continue holding the Command + S keys until you finish the MacOS installer Single User boot .
Enter these commands (change gpu-power-prefs to Intel GPU and boot verbose):
Code:nvram fa4ce28d-b62f-4c99-9cc3-6815686e30f9:gpu-power-prefs=%01%00%00%00 nvram boot-args="-v" reboot
If you've chosen the Arch Linux route, please continue reading:
Then you could either simply burn this ISO to CD/DVD (which later could be either inserted to MBP's SuperDrive or External DVD Drive connected to MBP by two USB cables) or create a bootable USB: use the great detailed instructions from this page, https://wiki.archlinux.org/index.php/USB_flash_installation_media
2) Boot to it: insert this CD/DVD/USB to Macbook Pro, hold Option key while booting, choose "EFI boot" (that is your bootable installation media), press "e" key to edit the GRUB options of the Arch Linux archiso x86_64 UEFI CD menu entry while it is selected at the main screen, add nomodeset to the end of this line and press Enter. If everything is done correctly, you will find yourself at the Linux console!
3) Edit EFI vars: looks like efivarfs filesystem is mounted by default! So you can already cd /sys/firmware/efi/efivars and ls to explore this directory and see if there is a "gpu-power-prefs-..." variable (where ... is UUID of this variable). If there is such a variable, its better to remove it with rm. In my case the efivarfs has been mounted by default with read/write permissions, but if you are getting the "operation not permitted" message while attempting to rm, it means that in your case efivarfs has been mounted as read-only and you need to remount it with read-write permissions and try again (credits to totoe_84 for this valuable addition) :
*) cd /
*) umount /sys/firmware/efi/efivars/
*) mount -t efivarfs rw /sys/firmware/efi/efivars/
*) cd /sys/firmware/efi/efivars/
If your screen is so distorted that it is difficult to see the letters, just start typing the rm gpu-power-pre and then press TAB key for autocompletion. In my case there were not such a EFI variable, only "gpu-active-..." and maybe somehow related "gfx-saved-config-restore-status-..." . Then I looked again at that gpu-switch text file (mentioned above, https://github.com/0xbb/gpu-switch/blob/master/gpu-switch),
and entered THESE COMMANDS:
*) chattr -i "/sys/firmware/efi/efivars/" <----- skip this command
Actually a gpu-switch script had "${sysfs_efi_vars}/${efi_gpu}" but I didnt have a "gpu-power-prefs-..." variable - so, partially by mistake, I didn't add that efi_gpu suffix and entered this incomplete path accidentally
*) printf "\x07\x00\x00\x00\x01\x00\x00\x00" > /sys/firmware/efi/efivars/gpu-power-prefs-fa4ce28d-b62f-4c99-9cc3-6815686e30f9
Did not have a EFI "gpu-power-prefs-" variable so I thought that it will be OK to create a new one with a random UUID - in this case, taken directly from a gpu-switch script
*) chattr +i "/sys/firmware/efi/efivars/gpu-power-prefs-fa4ce28d-b62f-4c99-9cc3-6815686e30f9"
http://www.tecmint.com/chattr-command-examples/ - chattr (Change Attribute) is a command line Linux utility that is used to set/unset certain attributes to a file in Linux system to secure accidental deletion or modification of important files and folders, even though you are logged in as a root user.
...
Syntax of chattr ---> chattr [operator] [flags] [filename]
...
A file is set with ‘i‘ attribute (+i as you see in this command) ---> cannot be modified (immutable). Means no renaming, no symbolic link creation, no execution, no writable, only superuser can unset the attribute.
...
Operator
This chattr command is supposed to lock a file to make it accessible only by "superuser" - and so that, while booting, your EFI will have no chance to screw up your gpu-power-prefs-... variable under any circumstances
- + : Adds the attribute to the existing attribute of the files.
- – : Removes the attribute to the existing attribute of the files.
- = : Keep the existing attributes that the files have.
*) cd /
Could not unmount efivars if you are inside this directory, so change to the root directory
*) umount /sys/firmware/efi/efivars/
Guarantees that your EFI variables are flushed to efivarfs filesystem, please unmount it safely before rebooting)
*) reboot
===> IF YOU DID EVERYTHING CORRECTLY, MOST LIKELY THAT YOUR MACBOOK PRO IS NOW USING INTEGRATED GRAPHICS WHILE BOOTING, AFTER BOOTING, AND IS WORKING GREAT AGAIN !
In the future maybe you could need to re-apply this solution if you would have to reset your PRAM / NVRAM / SMC because of some other problems, so remember this solution somewhere... Funny thing: now you can't switch to Discrete GPU even using gfxCardStatus, it is forever stuck at Integrated
I spent two working days to discover this solution, and really hope that it will work flawlessly for every MBP owner with a broken discrete GPU. Good luck!
=== NEWS ! YOU COULD ALSO FOLLOW THESE GUIDES FOR THE EXTRA IMPROVEMENTS : ===
Follow the MikeyN Guide - page 35 - #875 - to move the AMDRadeonX3000.kext from the /System/Library/Extensions directory and do not freeze Macbook Pro (at 75% progress bar or "IOConsoleUsers: gIOScreenLockState 3" message).
Rename old AMDRadeonX3000.kext and move new AMDRadeonX3000.kext after update - Page 57 - #1425
Shutdown or Restart Macbook Pro - avoid black screen freeze - Update 2 - Page 57 - #1425
Close the Lid - Sleep - Waking - Page 43 #1066 - Page 50 #1243
Register on MacRumors! This sidebar will go away, and you'll see fewer ads.