In this scenario, I would prefer to connect Controller's DP1.4 to two Macs using USB-C cable and HDMI2.1 to RTX 3080 (I don't mind not reaching full potential on windows because I don't use much). As usual thanks for the details.At this time the only real information we have about the new R1811 HDMI 2.1 version is the @Aiwi blog:

GitHub - aiwipro/5K-iMac-Studio-Display-Stock-Look: Converting a 5K iMac to act as a generic 5K display is nothing new. What is yet to be found is a conversion that keeps the stock iMac look. This is what this project aims to achieve.
Converting a 5K iMac to act as a generic 5K display is nothing new. What is yet to be found is a conversion that keeps the stock iMac look. This is what this project aims to achieve. - aiwipro/5K-i...github.com
He ends with the warning:
"Final Note
Using a USB-C cable from a Macbook works great on both inputs. Using an, allegedly bi-directional, USB-C to DP cable with an RTX3080 DP to USB-C (iMac Display) does not work on either input. I might purchase another USB-C DP cable to investigate further."
This may be caused by the extra USB-C 90º/straight adapters that @Aiwi uses in his input cables?
@joevt has tested 90º adapters with Thunderbolt 3. Five adapters worked, six failed in his test.
Become a MacRumors Supporter for $50/year with no ads, ability to filter front page stories, and private forums.
DIY 5k Monitor - success :-)
- Thread starter fiatlux
- Start date
- Sort by reaction score
You are using an out of date browser. It may not display this or other websites correctly.
You should upgrade or use an alternative browser.
You should upgrade or use an alternative browser.
With bidirectional DisplayPort<->USB-C cables being quite expensive and my first cable not working caused me to not bother ordering any more of them. My Macbook works in both of the ports, so I believe that the 90° adapters are working as they should.At this time the only real information we have about the new R1811 HDMI 2.1 version is the @Aiwi blog:
GitHub - aiwipro/5K-iMac-Studio-Display-Stock-Look: Converting a 5K iMac to act as a generic 5K display is nothing new. What is yet to be found is a conversion that keeps the stock iMac look. This is what this project aims to achieve.
Converting a 5K iMac to act as a generic 5K display is nothing new. What is yet to be found is a conversion that keeps the stock iMac look. This is what this project aims to achieve. - aiwipro/5K-i...
He ends with the warning:
"Final Note
Using a USB-C cable from a Macbook works great on both inputs. Using an, allegedly bi-directional, USB-C to DP cable with an RTX3080 DP to USB-C (iMac Display) does not work on either input. I might purchase another USB-C DP cable to investigate further."
This may be caused by the extra USB-C 90º/straight adapters that @Aiwi uses in his input cables?
@joevt has tested 90º adapters with Thunderbolt 3. Five adapters worked, six failed in his test.
Summarising:
- USB-C to USB-C works
- USB-C to USB-C to DP works
- DP to USB-C to DP didn't work with the cable I had. It should work, in theory.
I wanted follow up with one more question. My R1811 board is arriving in a few days. I‘m planning to keep this pretty simple and mainly just remove everything from the iMac and install the new board.That is correct.
But you can reinstall the speakers, if you wish to use them. Some of us use the built in speakers.
The camera, wifi and Bluetooth antenna you don't have to touch. Or replace the built in camera.
I would only add.
Be very careful when you remove the two ribbon cables that goes to the display panel from the motherboard. Make sure the clamps are released properly before pulling them out.
Carefully attach the new DP ribbon cable to the motherboard, without bending the end
The one thing I’m considering keeping though is the iMac speakers. For them to work with the board is it just a matter of connecting the existing wiring of the speakers to the board? Or, would I need to buy some sort of special connector in order to connect the speakers to the board?
Great…thank you for the redirect to PaulD-UK’s post and for the additional information. I’ll take a look for that part!!
Hi all, thanks to this thread I finally got around to refurbish an old 5K iMac (late 2015) with the JRY-W9CUHD-AA1 board. What can I say, I'm a cheapskate! I'm also lazy and tried to be as non-distructive as I could, I didn't want to drill any holes, etc.
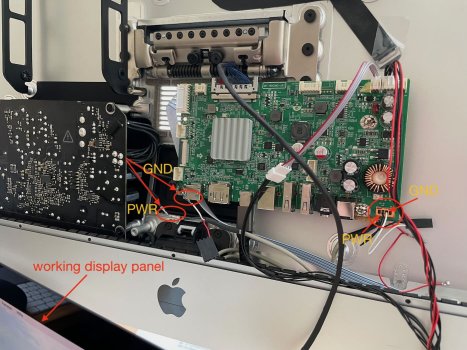
When I disassembled the iMac, I noticed that the iMac's internal power supply unit has an output of 12V–25A. Wait a minute, I thought, could I just use this as a power supply for the JRY board? It expects 12V, after all. I removed 1 GND and 1 PWR cable from the 12 pin thingie and connected it via an old cable to the JRY board (see attached picture). Much to my delight, it worked! I still have to use the helper board's power button, but that could be connected to the iMac's power button instead.
I searched this thread to make sure no-one has mentioned this option for JRY builds, so I decided to make an account and post it here.
Attachments
Good tip. It may be that the iMac PSU is only supplying a standby power current, which used to be 12v 3A for older iMacs, but if so, it seems that is enough. ")
With older iMacs the PSU needed the logic board feedback cable connected (to the diagonal socket on the screen side of the PSU PCB) to come out of standby mode and provide full power.
With older iMacs the PSU needed the logic board feedback cable connected (to the diagonal socket on the screen side of the PSU PCB) to come out of standby mode and provide full power.
Dang - I wish I had done this for my build! Good PS hacking!Hi all, thanks to this thread I finally got around to refurbish an old 5K iMac (late 2015) with the JRY-W9CUHD-AA1 board. What can I say, I'm a cheapskate! I'm also lazy and tried to be as non-distructive as I could, I didn't want to drill any holes, etc.
When I disassembled the iMac, I noticed that the iMac's internal power supply unit has an output of 12V–25A. Wait a minute, I thought, could I just use this as a power supply for the JRY board? It expects 12V, after all. I removed 1 GND and 1 PWR cable from the 12 pin thingie and connected it via an old cable to the JRY board (see attached picture). Much to my delight, it worked! I still have to use the helper board's power button, but that could be connected to the iMac's power button instead.
I searched this thread to make sure no-one has mentioned this option for JRY builds, so I decided to make an account and post it here.
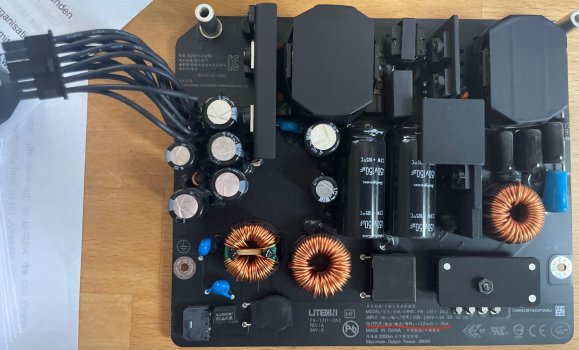
Wow, I didn't even consider that! Since yesterday I have tried various combinations of plugging in and out, turning on and off, going to sleep and waking up, rebooting, etc. and I haven't had an issue with standby so far, fingers crossed! I will write if I encounter any issues in the future. Here's a picture of the PSU that was in my iMac for reference.Good tip. It may be that the iMac PSU is only supplying a standby power current, which used to be 12v 3A for older iMacs, but if so, it seems that is enough.
With older iMacs the PSU needed the logic board feedback cable connected (to the diagonal socket on the screen side of the PSU PCB) to come out of standby mode and provide full power.
Btw, with the built-in PSU, the JRY controller is charging my MBP 🥳
Attachments
Good tip. It may be that the iMac PSU is only supplying a standby power current, which used to be 12v 3A for older iMacs, but if so, it seems that is enough.
With older iMacs the PSU needed the logic board feedback cable connected (to the diagonal socket on the screen side of the PSU PCB) to come out of standby mode and provide full power.
There doesn't (to my limited searching ability) appear to be consensus on whether its possible to fully 'activate' the 300W iMac 27 power supply without the original motherboard.
There is some good info in a couple of topics here about earlier 21.5 and 27 iMac power supplies, but nothing specific to the newer models I can find.
Looking for schematic diagram of 27" 2009-2011 iMac power supply, PA-2311-02A (liteOn)
Hi all, I'm looking for a schematic diagram of the 27" 2009-2011 models power supply, my model number is PA-2311-02A (LiteOn branded). If you happen to have the one of model ADP-310AF, I appreciate this, too. I have repaired several standard switch mode supplies, but Apples is more complex, with...
 forums.macrumors.com
I wonder if @USB3foriMac is around and might have any more helpful info?
And there's a YouTube video linked earlier in this thread which show a limited exploration of the power supply on a test bench, but it's very far from conclusive.
Re-using the 300W supply should be a simple way of powering a DIY 5K display if we can ascertain how to signal it to turn on. It remains to be seen whether the standby voltage is adequate (especially over a dodgy wiring connection) depending on how individuals use their displays and accessories.
Standard iMacs were not VESA compatible. A special VESA mount had to be purchased to replace the "foot/hinge" assembly.hello everyone,
As I received the used 5K iMac late 2015 model, how do I supposed to know whether it is VESA compatible or not? thanks
This is the VESA kit that fits inside the 2012-19 iMac case to replace the original stand:

 www.bestinmac.com
Apple Kit VESA iMac 27 A1419 (2012-2017) & A2115 (2019-2020)
Apple Kit VESA Support de montage Aluminium iMac 27" A1419 (2012-2017) & A2115 (2019-2020) - En Stock - Garantie 1 an - Livraison 24h/48h.
www.bestinmac.com
I'm around as this thread is highly interesting. I though all along why not use the built-in supply. However, I do not have any newer iMac to check the connection, and I also don't have the schematics.I wonder if @USB3foriMac is around and might have any more helpful info?
If someone can post the MLB number, I might be able to find it. Also, model no. of the power supply (maybe it's here already). If someone already got the pinning of the Power supply to MLB connector, then that'd be best.
The signal on the 2011 was "PS_ON", and it had to bridged to GND to switch main power on. I'd guess this circuit wouldn't change, so suspect it's still the same.
Alternatively, a simple Flip-flop circuit could be used to generate a PS_ON from the (any) power button.
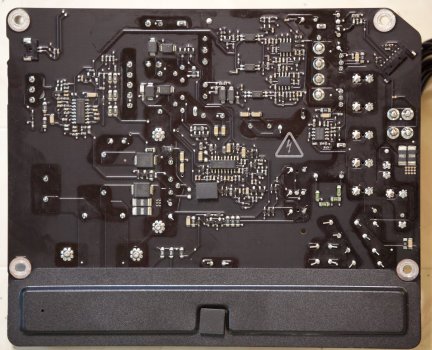
Update: I looked at some pics in the web, and it looks like the wires on the power supply are lumped into 4 connections only. I can't see the details there. Would help if someone can provide some closeups.
If several wires are lumped into a single solder point, it means this is a high-current connection and not a control point. I'd expect some control pins, such as for the SMB bus, so there should be some individual wire connections as well. Maybe just a few. It might be possible to trace these back to the respective chip (SMB comms chip, or MOSFET). A MOSFET would be for controlling the output, that's what you are looking for.
So, some close-ups of PCB tracks around that area plus the nearby chips/FETs might help.
The large connector apparently only goes to the 4 huge solder points at the bottom right in this crop.
The small connector, if connected, must then be the one to handle the SMC bus and supply control. This image isn't sharp enough to see anything. I'd need closeups of the PCB tracks and the designations of the 3-legged components (the tiny one, and the two on the other side, mounted to heatsink) and the IC. The IC is likely the SMC chip. For supply control, the 3-legged surface-mount part is a bit small, that's not a power FET.
Possibly one of the components on the other side, mounted to the heatsink. They would be suitable to switch high currents. Likely the biggest one is for 12V/25A.
Last edited:
It was a separate kit the user purchased from Apple while or after buying the standard iMac. It came with instructions on how to remove the stock stand and install the kit. It wasn't all that hard - I did it with my 2009 iMac from years ago to put it on an Ergotron stand.
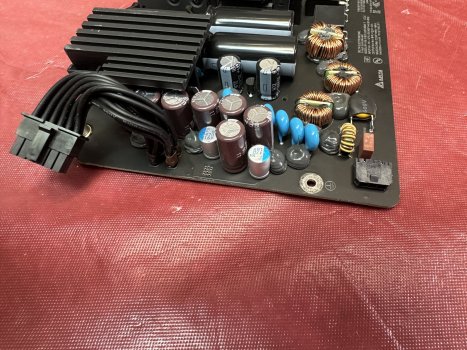
The PS from the 2015 iMac I used for my conversion is just sitting in a box - so I grabbed some shots for you - hope they help.I'm around as this thread is highly interesting. I though all along why not use the built-in supply. However, I do not have any newer iMac to check the connection, and I also don't have the schematics.
If someone can post the MLB number, I might be able to find it. Also, model no. of the power supply (maybe it's here already). If someone already got the pinning of the Power supply to MLB connector, then that'd be best.
The signal on the 2011 was "PS_ON", and it had to bridged to GND to switch main power on. I'd guess this circuit wouldn't change, so suspect it's still the same.
Alternatively, a simple Flip-flop circuit could be used to generate a PS_ON from the (any) power button.
Update: I looked at some pics in the web, and it looks like the wires on the power supply are lumped into 4 connections only. I can't see the details there. Would help if someone can provide some closeups.
If several wires are lumped into a single solder point, it means this is a high-current connection and not a control point. I'd expect some control pins, such as for the SMB bus, so there should be some individual wire connections as well. Maybe just a few. It might be possible to trace these back to the respective chip (SMB comms chip, or MOSFET). A MOSFET would be for controlling the output, that's what you are looking for.
So, some close-ups of PCB tracks around that area plus the nearby chips/FETs might help.
View attachment 2369839
The large connector apparently only goes to the 4 huge solder points at the bottom right in this crop.
The small connector, if connected, must then be the one to handle the SMC bus and supply control. This image isn't sharp enough to see anything. I'd need closeups of the PCB tracks and the designations of the 3-legged components (the tiny one, and the two on the other side, mounted to heatsink) and the IC. The IC is likely the SMC chip. For supply control, the 3-legged surface-mount part is a bit small, that's not a power FET.
Possibly one of the components on the other side, mounted to the heatsink. They would be suitable to switch high currents. Likely the biggest one is for 12V/25A.


Attachments
The “not that hard” user-replaceable VESA adapter only applied to the 2008-11 iMacs, and the iMac Pro.
To add the VESA adapter to iMacs between 2012-19 requires complete dismantling and logic board removal so is only ‘easy’ if you are making a DIY monitor. 😉
You replace the 3-hole-each-side bracket to hold the mount.
To add the VESA adapter to iMacs between 2012-19 requires complete dismantling and logic board removal so is only ‘easy’ if you are making a DIY monitor. 😉
You replace the 3-hole-each-side bracket to hold the mount.
Last edited:
I guess I lucked out with my old 2009 model back in the day!The “not that hard” user-replaceable VESA adapter only applied to the 2008-11 iMacs, and the iMac Pro.
To add the VESA adapter to iMacs between 2012-19 requires complete dismantling and logic board removal so is only ‘easy’ if you a making a DIY monitor. 😉
You replace the 3-hole-each-side bracket to hold the mount.
@fhall1
What @USB3foriMac needs is a well lit sharp picture like he posted showing the back of the pcb with the cut-off corner and the board traces and components behind the 7 pin oblique connector. 👍
What @USB3foriMac needs is a well lit sharp picture like he posted showing the back of the pcb with the cut-off corner and the board traces and components behind the 7 pin oblique connector. 👍
Are these better?@fhall1
What @USB3foriMac needs is a well lit sharp picture like he posted showing the back of the pcb with the cut-off corner and the board traces and components behind the 7 pin oblique connector. 👍


I tried this Vivo kit with the stand that is holding LG 4K monitor but iMac is really heavy and couldn't hold the weight. I need to find the right VESA stand to support such a weight. If you have any stand please do suggest me.
I think I will consider DIY solution when I put R1811 with Apple Kit VESA.
I think I will consider DIY solution when I put R1811 with Apple Kit VESA.
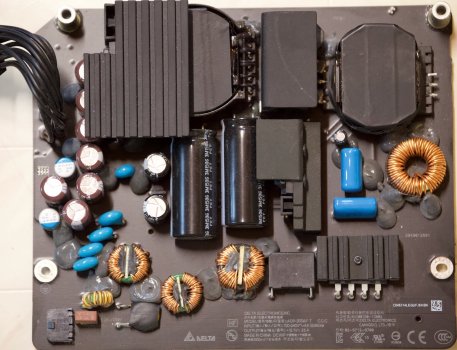
I took two full frame DSLR photos, to give both some detail, and overview. But they were to big. I hope the smaller size still serves the purpose.Update: I looked at some pics in the web, and it looks like the wires on the power supply are lumped into 4 connections only. I can't see the details there. Would help if someone can provide some closeups.
PSU from iMac 27" late 2015
Attachments
Last edited:
Hey mate. I just removed the whole hinge mechanism and used a $15 monitor mount from Amazon. I just put the 2 bolts through the old hinge hole. Works perfect.hello everyone,
As I received the used 5K iMac late 2015 model, how do I supposed to know whether it is VESA compatible or not? thanks
Attachments
Register on MacRumors! This sidebar will go away, and you'll see fewer ads.